![]() Panasonic Electric Works Networks Co., Ltd. > Support > Setting Examples > Syslog Transfer Setting Procedure
Panasonic Electric Works Networks Co., Ltd. > Support > Setting Examples > Syslog Transfer Setting Procedure
ここから本文です。
Syslog Transfer Setting Procedure
Introduction
This setting example explains the procedure of the Syslog transfer setting for switches.
Applicable models
Overview
Settings for transferring Syslog of switches to another host are configured.
This setting enables the switch to transfer its system log to terminals including Syslog servers.
Configuration Example
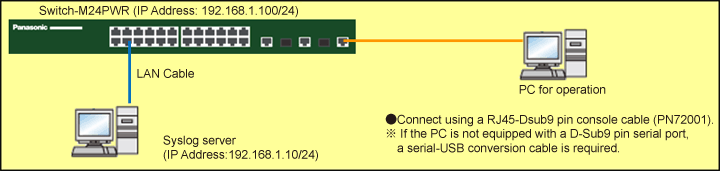
Overall setting flow
- 1. Set the IP address of Switch-M24PWR.
- 2. Register data of the Syslog server with Switch-M24PWR.
- 3. Enable the function to transfer the logs to Syslog servers.
Setting Procedure
Step 1.
Connect the PC and Ethernet Switch using a twisted pair cable and console cable, and display the setting screen on Hyper terminal.
(Refer to Setting Example "Ethernet Switch Connection Procedure to a Console Port" for the procedure to display the setting screen on the console port)
Step 2.
On the login screen, enter Login and Password (both set as manager by default), and login to the setting screen. (Refer to Figure 1)

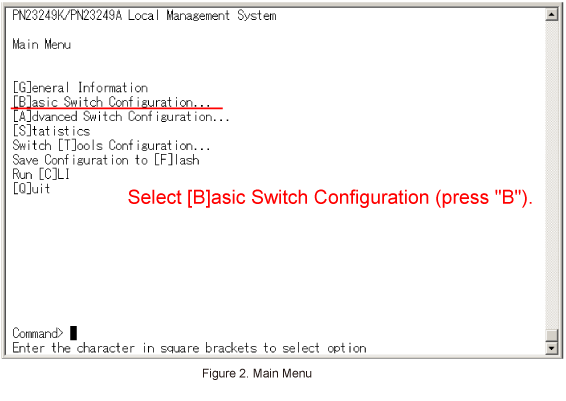
Step 3.
"In Main Menu, select [B]asic Switch Configuration. (Refer to Figure 2)
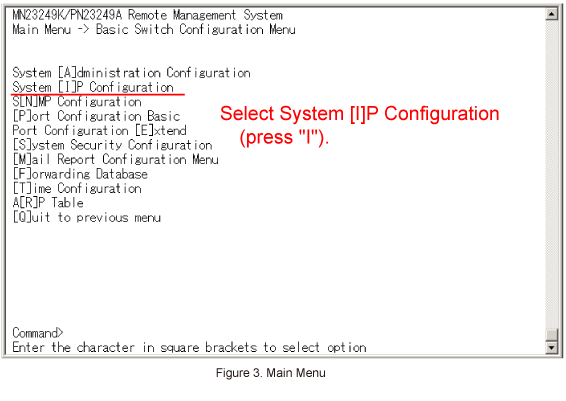
Step 4.
In Basic Switch Configuration Menu, select System [I]P Configuration. (Refer to Figure 3)
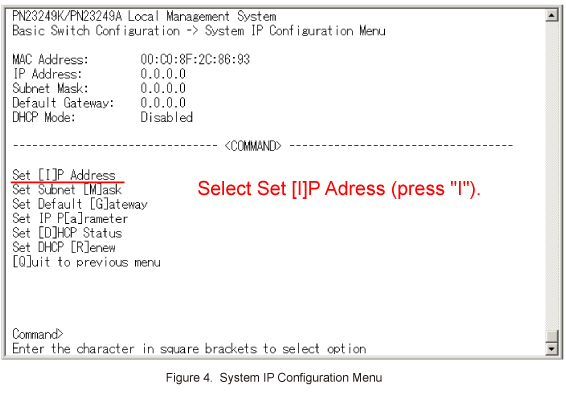
Step 5.
In System IP Configuration Menu, select Set [I]P Address. (Refer to Figure 4)
When Enter destination IP address > is displayed, enter 192.168.1.100 and press the Enter key.
Step 6.
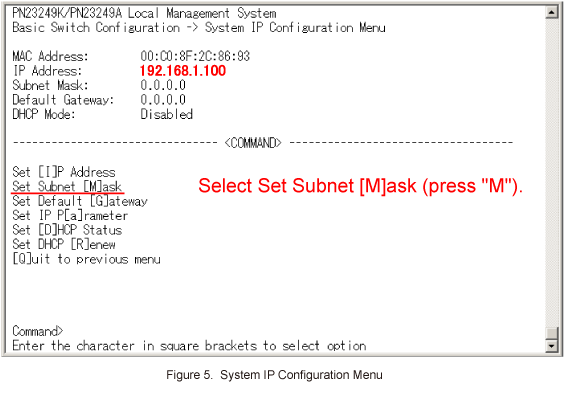
In System IP Configuration Menu, select Set Subnet [M]ask. (Refer to Figure 5)
When Enter subnet mask > is displayed, enter 255.255.255.0 and press the Enter key.
Step 7.
In System IP Configuration Menu, select [Q]uit to previous menu to go back to Basic Switch Configuration Menu. (Refer to Figure 6)

Step 8.
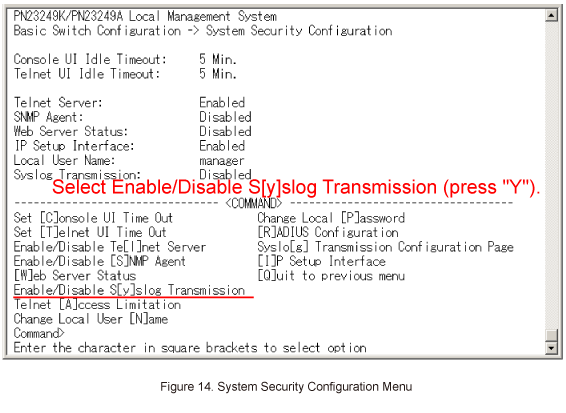
In Basic Switch Configuration Menu, select [S]ystem Security Configuration. (Refer to Figure 7)

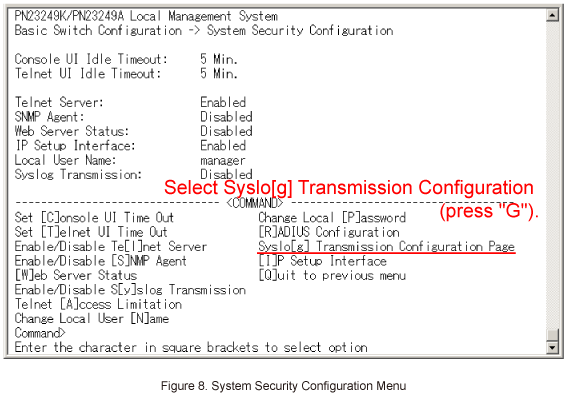
Step 9.
In System Security Configuration Menu, select Syslo[g] Transmission Configuration Page. (Refer to Figure 8)
Step 10.
In Syslog Transmission Configuration Menu, select Set Server [I]P. (Refer to Figure 9)
When Enter manager entry number > is displayed, enter 1 (Syslog Server List No.1) and press the Enter key.
Then, when Enter IP address for manager > is displayed, enter 192.168.1.10 (the IP address of the Syslog server) and press the Enter key.

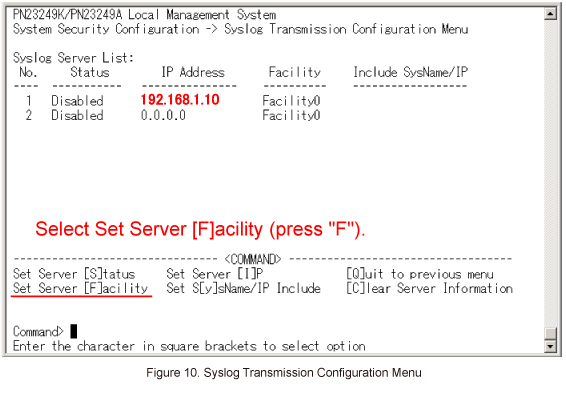
Step 11.
In Syslog Transmission Configuration Menu, select Set Server [F]acility. (Refer to Figure 10)
When Enter manager entry number > is displayed, enter 1 (Syslog Server List No.1) and press the Enter key.
Then, when Enter Server Facility > is displayed, enter a value within the range from 0 to 7 (Local0-Local7) and press the Enter key.
(Enter 0 in this case)
Step 12.
In Syslog Transmission Configuration Menu, select Set S[y]sName/IP Include. (Refer to Figure 11)
When Enter manager entry number > is displayed, enter 1 (Syslog Server List No.1) and press the Enter key.
Then, when Enter Include Information > is displayed, enter S (SysName), I (IP Address), or N (None), and press the Enter key.
(Select I in this case)

Step 13.
In Syslog Transmission Configuration Menu, select Set Server [S]tatus. (Refer to Figure 12)
When Enter manager entry number > is displayed, enter 1 (Syslog Server List No.1) and press the Enter key.
Then, when Enable or Disable Server (E/D) > is displayed, select E (Enable).

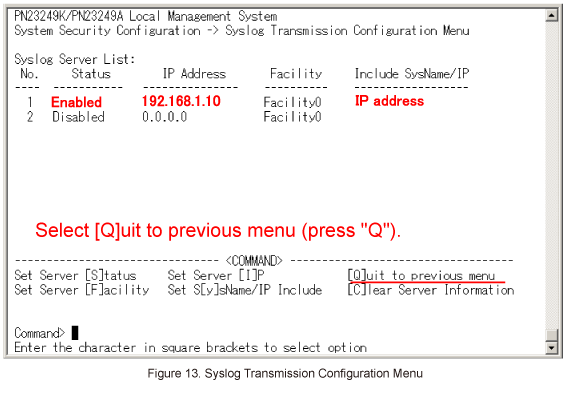
Step 14.
Once all of the items are entered in Syslog Transmission Configuration Menu, select [Q]uit to previous menu to go back to System Security Configuration Menu. (Refer to Figure 13)
Step 15.
In System Security Configuration Menu, select Enable/Disable S[y]slog Transmission. (Refer to Figure 14)
Step 16.
When the status of Syslog Transmission is displayed as Enabled in System Security Configuration Menu, the settings are completed. (Refer to Figure 15)
Select [Q]uit to previous menu to go back to Main Menu.

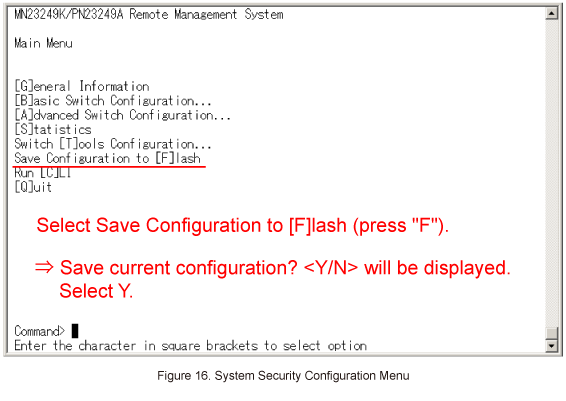
Step 17.
In Main Menu, select Save Configuration to [F]lash to save the settings. (Refer to Figure 16)
When the screen is switched to display Save current configuration? (Y/N) >, select Y.
Step 18.
When the settings are saved successfully and the message "Saving configuration to flash is successful, press any key to continue...is displayed, press any key.
Main Menu will be displayed again.
Step 19.
Confirm that the logs such as login by console (Login from Console) and the log which is recorded after settings are saved (Configuration changed) are transferred to the Syslog server.
If the SNMP trap is configured, the SNMP trap log can be transferred to the Syslog server as well.
ここからサブメニューです。