ページの先頭です。
ここから本文です。
SNMP Setting Procedure
Introduction
This setting example explains the procedure of SNMP setting for switches.
Applicable models
Overview
Conduct SNMP setting for a switch to enable to monitor from an SNMP server.
Also, set the switch to send traps to the SNMP server.
Configuration Example

Overall setting flow
- 1. Set Switch-M24PWR.
- 1) Set the IP address to 192.168.1.254/24.
- 2) Enable SNMP, register a community named panasonic as read_only, disable unnecessary groups, and register information of a server to receive traps (IP address=192.168.1.1, version=v2c, community name=panasonic).
- 2. Connect Switch-M24PWR and the terminal as shown in the configuration diagram.
- 3. Confirm that Switch-M24PWR can be monitored from the SNMP server and a trap is transmitted to the SNMP server when a port link down occurs on Switch-M24PWR.
Setting Procedure
Step 1.
Connect the PC and Ethernet switch using a twisted pair cable and console cable, and display the setting screen on Hyper terminal.
(Refer to Setting Example "Ethernet Switch Connection Procedure to a Console Port" for the procedure to display the setting screen on the console port)
Step 2.
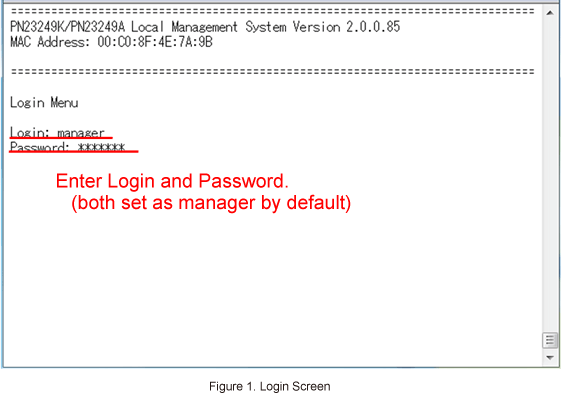
On the login screen, enter Login and Password (both set as manager by default), and login to the setting screen. (Refer to Figure 1)
Step 3.
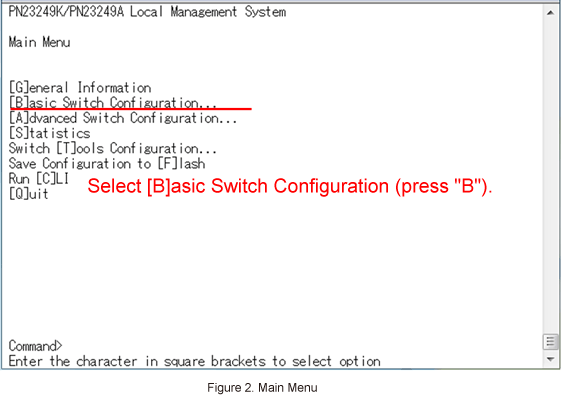
In Main Menu, select [B]asic Switch Configuration. (Refer to Figure 2)
Step 4.
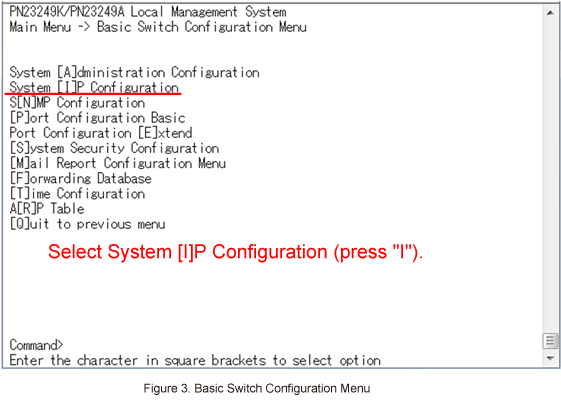
In Basic Switch Configuration Menu, select System [I]P Configuration. (Refer to Figure 3)
Step 5.
In System IP Configuration Menu, select Set [I]P Address and enter the IP address (192.168.1.254). (Refer to Figure 4)

Step 6.
In System IP Configuration Menu, select Set Subnet [M]ask and enter the subnet mask (255.255.255.0).
Step 7.
After performing all the settings, confirm that the settings are in the following status. (Refer to Figure 5)

Step 8.
In System IP Configuration Menu, select [Q]uit to previous menu to go back to Basic Switch Configuration Menu.
Step 9.
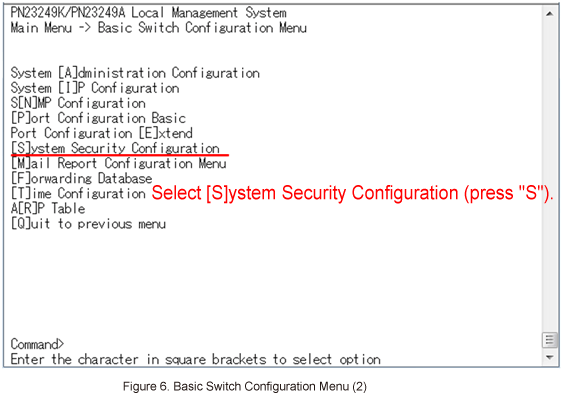
In Basic Switch Configuration Menu, select [S]ystem Security Configuration. (Refer to Figure 6)
Step 10.
In System Security Configuration, select Enable/Disable [S]NMP Agent to enable SNMP. (Refer to Figure 7)

Step 11.
In System Security Configuration Menu, select [Q]uit to previous menu to go back to Basic Switch Configuration Menu.
Step 12.
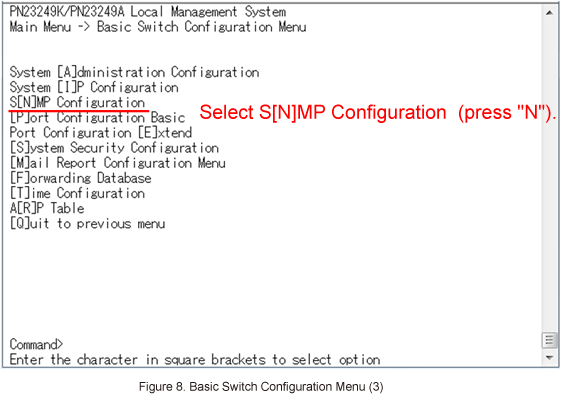
In Basic Switch Configuration Menu, select S[N]MP Configuration. (Refer to Figure 8)
Step 13.
In SNMP Configuration Menu, select SNMP [M]anagement Configuration. (Refer to Figure 9)

Step 14.
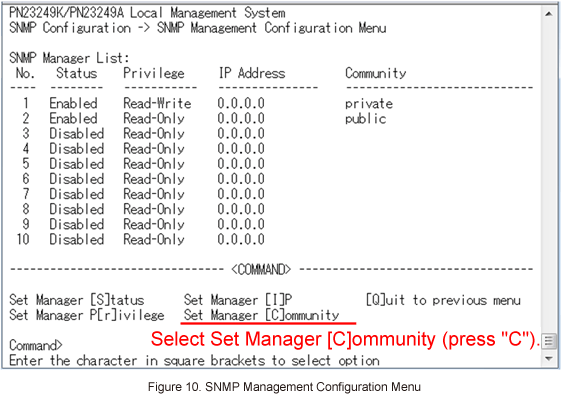
In SNMP Management Configuration Menu, select Set Manager [C]ommunity and register the community name (panasonic) to number 3. (Refer to Figure 10)
Step 15.
In SNMP Management Configuration Menu, select Set Manager [S]tatus and enable number 3. (Refer to Figure 11)

Step 16.
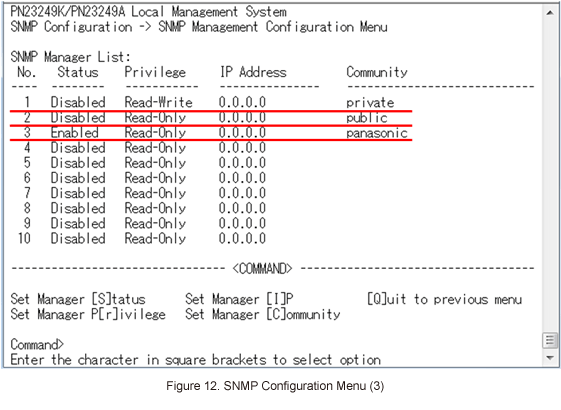
In SNMP Management Configuration Menu, select Set Manager [S]tatus and disable numbers 1 and 2.
Step 17.
After performing all the settings, confirm that the settings are in the following status. (Refer to Figure 12)
* If the IP address is 0.0.0.0, monitoring from any terminals with any IP address is available.
To monitor a specific terminal only, specify its IP address.
Step 18.
In SNMP Management Configuration Menu, select [Q]uit to previous menu to go back to SNMP Configuration Menu.
Step 19.
In SNMP Configuration Menu, select SNMP [T]rap Receiver Configuration. (Refer to Figure 13)

Step 20.
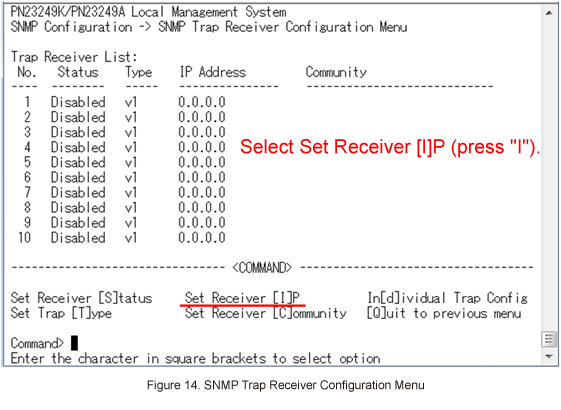
In SNMP Trap Receiver Configuration Menu, select Set Receiver [I]P, and set IP address of the SNMP trap receiver (192.168.1.1) to number 1. (Refer to Figure 14)
Step 21.
In SNMP Trap Receiver Configuration Menu, select Set Receiver [C]ommunity and set a community name (panasonic) to number 1. (Refer to Figure 15)

Step 22.
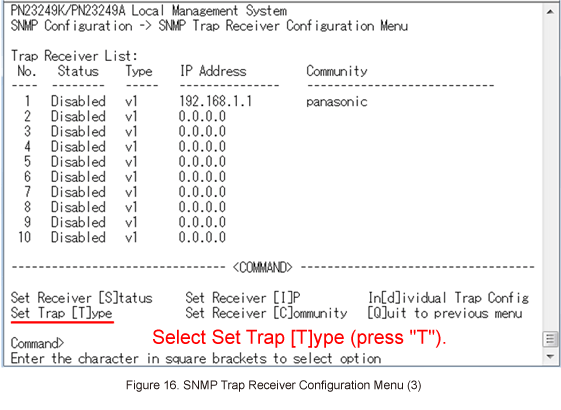
In SNMP Trap Receiver Configuration Menu, select Set Trap [T]ype and select "2" of v2c to set to number 1. (Refer to Figure 16)
Step 23.
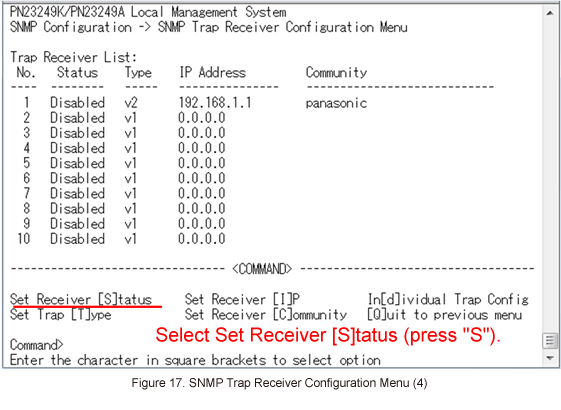
In SNMP Trap Receiver Configuration Menu, select Set Receiver [S]tatus and enable number 1. (Refer to Figure 17)
Step 24.
After performing all the settings, confirm that the settings are in the following status. (Refer to Figure 18)

Step 25.
After completing the settings, save the settings using Save Configuration to [F]lash.
Step 26.
Connect Switch-M24PWR and SNMP server as shown in the configuration diagram, and confirm that Switch-M24PWR can be monitored from the SNMP server and trap is transmitted to the SNMP server when a port link down occurs on Switch-M24PWR.
ここからサブメニューです。