ページの先頭です。
ここから本文です。
Ethernet Switch Connection Procedure to a Console Port
Introduction
This setting example explains Ethernet Switch Connection Procedure to a Console Port using a terminal emulator software "HyperTerminal", which is pre-installed in Windows. For details on the settings and operation commands, refer to the user manuals on our website or other related instructions.
(For Windows Vista or later versions, the terminal emulator software needs to be installed.)
Applicable models (each model uses a different console cable)
| With RJ45-DSub9 pin console cable (PN72002) | |
|---|---|
| Product name | Product number |
| Switch-M48eG | PN28480K |
| Switch-M24eG | PN28240K |
| Switch-M16eG | PN28160K |
| Switch-M8eG | PN28080K |
| Switch-M24eGLPWR+ | PN28248 |
| Switch-M16eGLPWR+ | PN28168 |
| Switch-M12eGLPWR+ | PN28128 |
| Switch-M8eGLPWR+ | PN28088 |
| Switch-M5eGLPWR+ | PN28058 |
| Switch-M24PWR | PN23249K |
| Switch-M16PWR | PN23169K |
| Switch-M12PWR | PN23129K |
| Switch-M8ePWR | PN27089K |
| Switch-M8esPWR | PN27089N |
| Switch-S24GPWR | PN25249 |
Setting content and procedure
Connect the Windows PC for operation and the Ethernet Switch with a console cable, and start HyperTerminal along with the following steps:

Setting Procedure
Step 1.
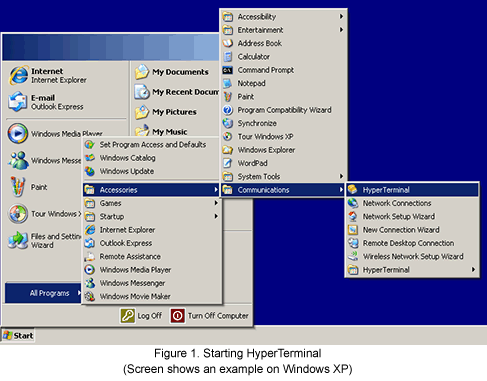
Click the [Start] button on Windows task bar, and select [All Programs] → [Accessories] → [Communications] → [HyperTerminal]. (Refer to Figure 1)
Step 2.
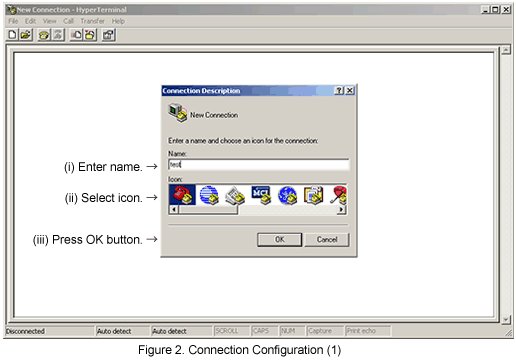
"Connection Description" window appears. Enter an arbitrary name (for example, test), select an icon and click [OK] in the window. (Refer to Figure 2)
Step 3.
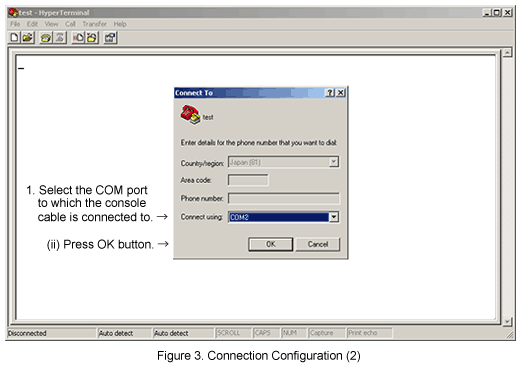
"Connect To" window appears. Click the pull-down menu of the "Connect using" field, select the COM port to which the console cable is connected and click [OK]. (Refer to Figure 3)
Step 4.
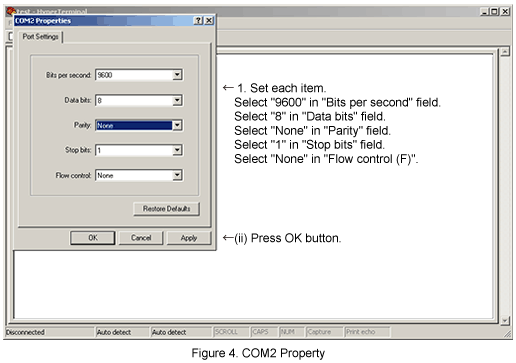
On the "COM2 (COM port number varies depending on the environment of the PC to which the console cable is connected) Properties" window, click the pull-down menu of the "Bits per second" field and select "9600". (Refer to Figure 4)
Step 5.
Click the pull-down menu of the "Flow control" field, select "None" and click [OK]. (Refer to Figure 4)
Step 6.
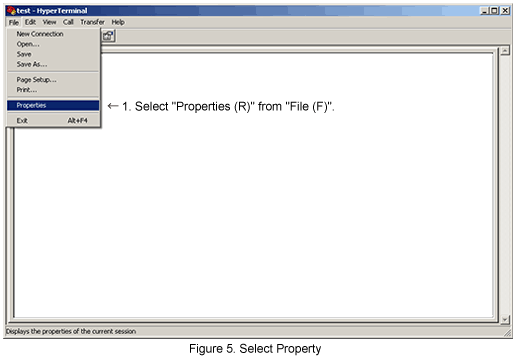
Click [File] in main menu of HyperTerminal and select [Properties]. (Refer to Figure 5)
Step 7.
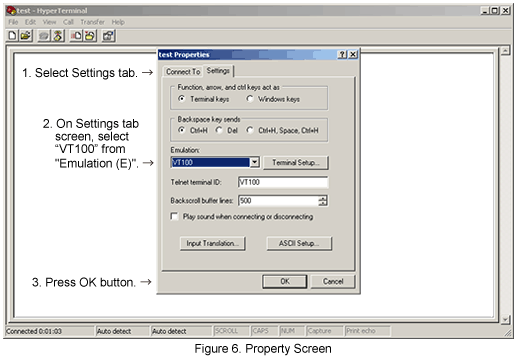
"<name> Properties" (<name> is the name entered in Step 2) window appears.
Then, click the "Settings" tab at the upper part of the window to switch the tab, click the pull-down menu of the "Emulation" field, select "VT100" from the list displayed and click [OK]. (Refer to Figure 6)
Step 8.
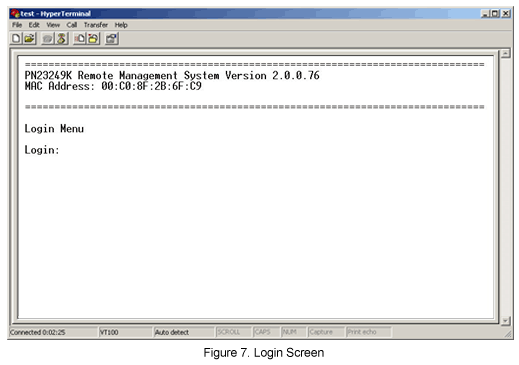
The login screen of the Ethernet Switch appears. Refer to its user manual to set the device.
(If the login screen is not displayed, press the Enter key several times)
Step 9.
When the settings are complete, click [File] in main menu of HyperTerminal and click [Exit].
A dialog asking if you want to disconnect the terminal appears. Click the [Yes].
Then, another dialog asking if you want to save HyperTerminal settings appears. Click the [Yes].
Step 10.
In HyperTerminal window, a file "<name>.ht" (<name> is the name entered in Step 2) is created.
From the next time, you can set the device by only double-clicking "<name>.ht" to start HyperTerminal and follow Step 8.
ここからサブメニューです。