![]() Panasonic Electric Works Networks Co., Ltd. > Support > Setting Examples > SNMP Setting Procedure (for WEB)
Panasonic Electric Works Networks Co., Ltd. > Support > Setting Examples > SNMP Setting Procedure (for WEB)
ここから本文です。
SNMP Setting Procedure (for WEB)
Introduction
This setting example explains the procedure of SNMP setting for switches for WEB
Applicable models
| Applicable models | |
|---|---|
| Product number | Product name |
| PN28248 | Switch-M24eGLPWR+ |
| PN28168 | Switch-M16eGLPWR+ |
| PN28128 | Switch-M12eGLPWR+ |
| PN28088 | Switch-M8eGLPWR+ |
| PN28058 | Switch-M5eGLPWR+ |
| PN23249K | Switch-M24PWR |
| PN23169K | Switch-M16PWR |
| PN23129K | Switch-M12PWR |
Overview
Conduct SNMP setting for the switch to enable to monitor from an SNMP server.
Also, set the switch to send traps to the SNMP server.
Configuration Example

Setting Flow
- 1. Connect to the Web management screen of Switch-M24PWR.
- 2. Set Switch-M24PWR.
- 1) Enable the SNMP agent.
- 2) Set the SNMP manager.
- 3) Set the SNMP trap.
- 3. Connect Switch-M24PWR and SNMP server as shown in the configuration diagram, and confirm that Switch-M24PWR can be monitored from the SNMP server.
- 4. Confirm that a trap is transmitted to the SNMP server when a port link down occurs on Switch-M24PWR.
Setting Procedure
Step 1. Connect to the Web management screen of Switch-M24PWR and login.
Connect the PC and Ethernet switch using a twisted pair cable, and connect to the Web management screen of Switch-M24PWR.
(Refer to setting example "Connection Procedures to Ethernet Switch Web Management Screen" for the procedure to connect to the Web management screen)
Step 2. Enable the SNMP agent.
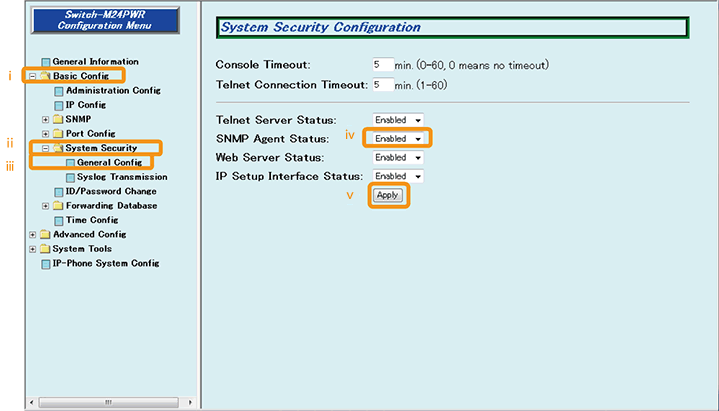
1) Select “Basic Config” → “System Security” → “General Config” (i → ii → iii).
2) Change “SNMP Agent Status” to “Enabled” (iv).
3) Apply the change by “Apply” (v).
Step 3. Set the SNMP manager.
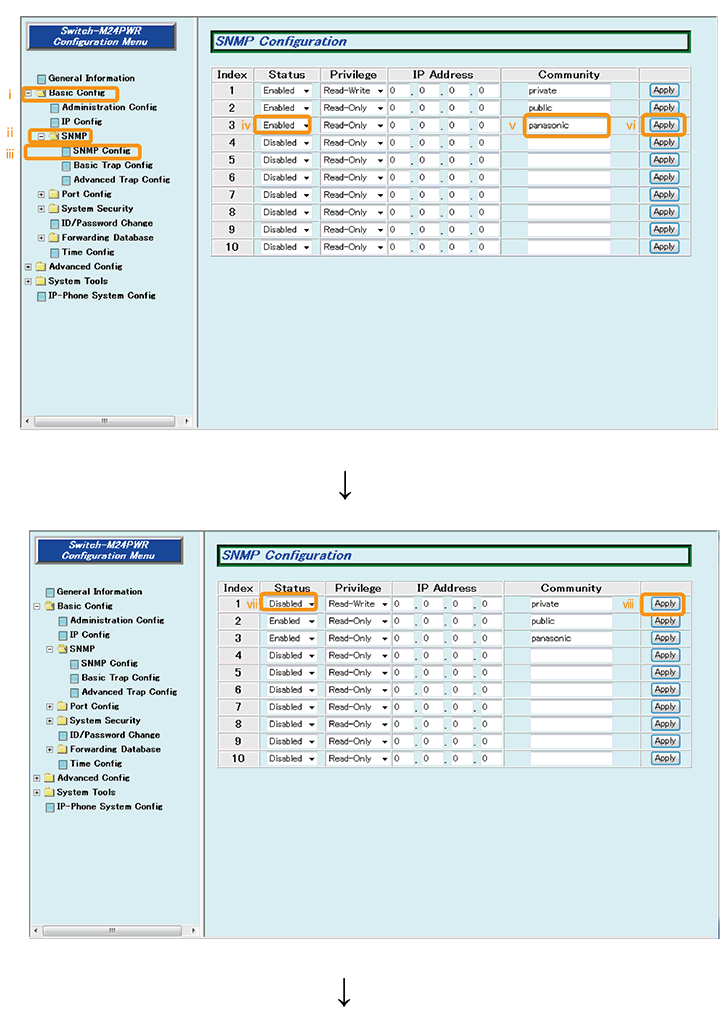
1) Select “Basic Config” → “SNMP” → “SNMP Config” (i → ii → iii).
2) Change the “Status” of Index No. 3 to “Enabled,” enter “panasonic” in “Community,” and press the “Apply” button (iv → v → vi).
3) Change the “Status” of Index No. 1 to “Disabled” and press the “Apply” button (vii → viii).
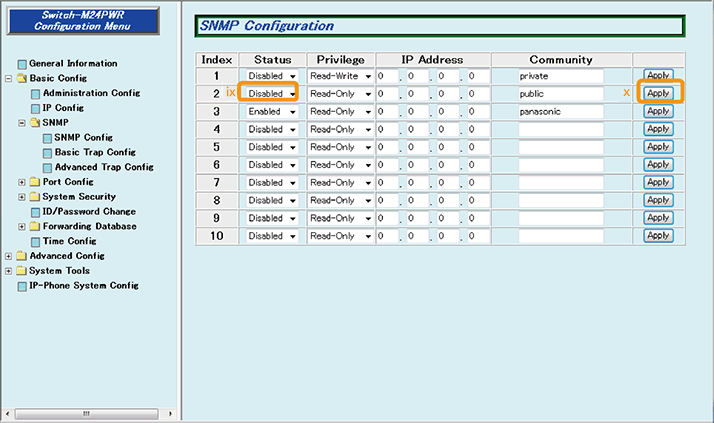
4) Change the “Status” of Index No. 2 to “Disabled” and press the “Apply” button (ix → x).
Step 4. Set the SNMP trap.
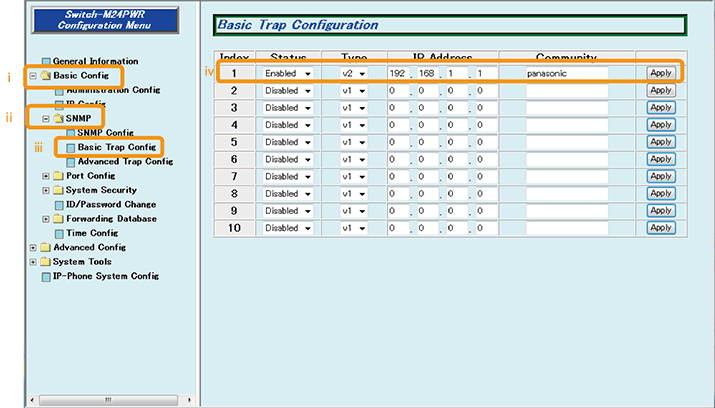
1) Select “Basic Config” → “SNMP” → “Basic Trap Config” (i → ii → iii).
2) Change Index No. 1 to the following setting and press the “Apply” button (iv).
Status: Enable Type: v2 IP Address: 192.168.1.1 Community: panasonic
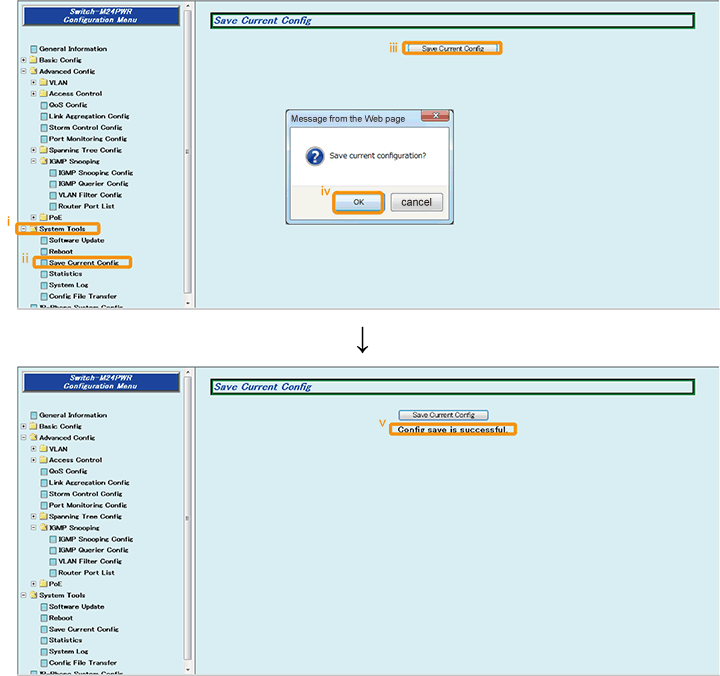
Step 5. Save the settings.
1) Select “System Tools”. → ”Save Current Config”(i → ii).
2) Save the settings by “Save Current Config”(iii).
3) Execute saving by “OK”(iv).
4) Confirm that the settings are saved successfully (v).
Step 6. Connect the devices.
Referring to the configuration example, connect the devices.
Step 7. Execute operation check.
Confirm that Switch-M24PWR can be monitored from the SNMP server and a trap is transmitted to the SNMP server when a port link down occurs on Switch-M24PWR.
ここからサブメニューです。