![]() Panasonic Electric Works Networks Co., Ltd. > Support > Setting Examples Ethernet Switch Spanning Tree Setting Procedure (for WEB)
Panasonic Electric Works Networks Co., Ltd. > Support > Setting Examples Ethernet Switch Spanning Tree Setting Procedure (for WEB)
ここから本文です。
Setting Examples > Ethernet Switch Spanning Tree Setting Procedure (for WEB)
Introduction
This setting example explains the procedure of Spanning Tree Setting for switches for WEB.
Applicable models
| Applicable models | |
|---|---|
| Product number | Product name |
| PN28248 | Switch-M24eGLPWR+ |
| PN28168 | Switch-M16eGLPWR+ |
| PN28128 | Switch-M12eGLPWR+ |
| PN28088 | Switch-M8eGLPWR+ |
| PN28058 | Switch-M5eGLPWR+ |
| PN23249K | Switch-M24PWR |
| PN23169K | Switch-M16PWR |
| PN23129K | Switch-M12PWR |
Overview
By setting the spanning tree (RSTP), a specific port can be blocked, and occurrence of broadcast storms can be avoided.
It also enables to continue the network communication at the time of path failure by automatically switching it over to a different path.
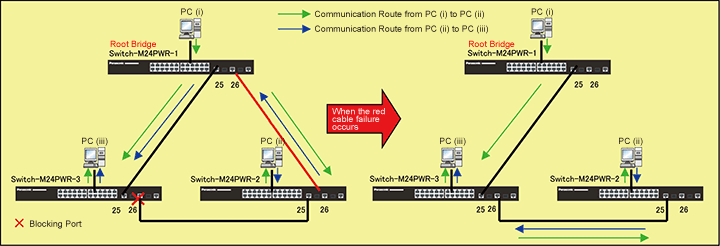
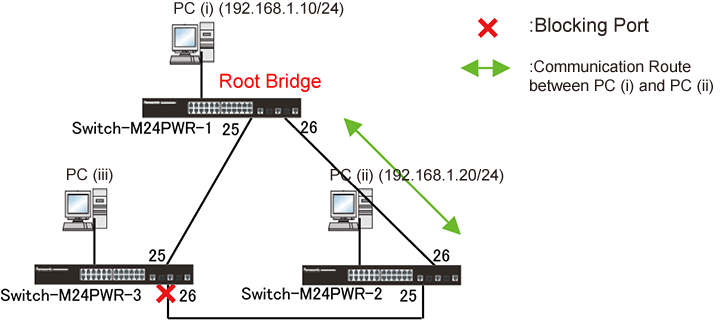
3 units of switches are used. The loop configuration is built using Ports 25 and 26.
Configuration Example
Setting Flow (common to Switch-M24PWR-1, Switch-M24PWR-2, and Switch-M24PWR-3)
- 1. Connect to the Web Management Screen of Switch-M24PWR.
- 2. Set Switch-M24PWR.
- 1) Enable the spanning tree (RSTP).
- 2) Change the bridge priority value. (Switch-M24PWR-1: 0x6000, Switch-M24PWR-2: 0x7000, Switch-M24PWR-3: 0x8000)
* Change to the value of Switch-M24PWR-1 to the smallest value so that Switch-M24PWR-1 becomes the route bridge.
* Change the value of Switch-M24PWR-3 to the largest value so that the Switch-M24PWR-3 port (connecting port to Switch-M24PWR-2) becomes the blocking port.
- 3. Connect the devices as shown in the configuration example and confirm the performance of the path with attained redundancy.
Setting Procedure
Step1. Connect to the Web management screen of Switch-M24PWR and login.
Connect the PC and Ethernet Switch using a twisted pair cable, and connect to the Web management screen of Switch-M24PWR.
(Refer to setting example "Connection Procedures to Ethernet Switch Web Management Screen" for the procedure to connect to the Web management screen)
Step 2. Enable the STP global status (common to Switch-M24PWR-1, Switch-M24PWR-2, and Switch-M24PWR-3).
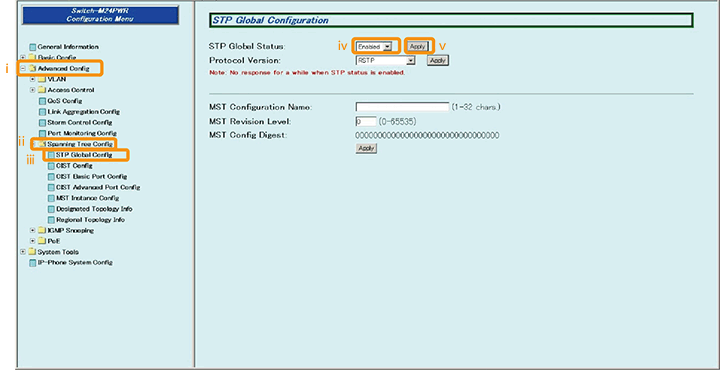
1) Select “Advanced Config” → ”Spanning Tree Config” → ”STP Global Config” (i → ii → iii).
2) Select “Enabled” from the pull down menu of “STP Global Status” (iv).
3) Set by “Apply” (v).
* When the STP global status is enabled, the connection with the PC is disconnected for several tens of seconds. Reconnect the PC.
Step 3. Set the bridge priority to 0x6000 (Switch-M24PWR-1).
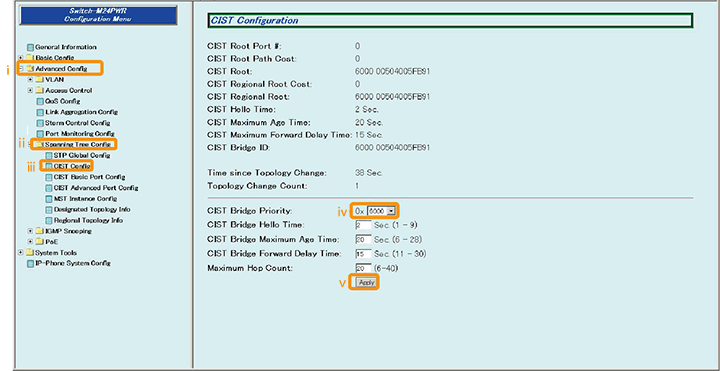
1) Select “Advanced Config” → ”Spanning Tree Config” → ”CIST Config” (i → ii → iii).
2) Select “6000” from the pull down menu of “CIST Bridge Priority” (iv).
3) Set by “Apply” (v).
Step 4. By similar procedures, set the bridge priority to 0x7000 (Switch-M24PWR-2) and 0x8000 (Switch-M24PWR-3).
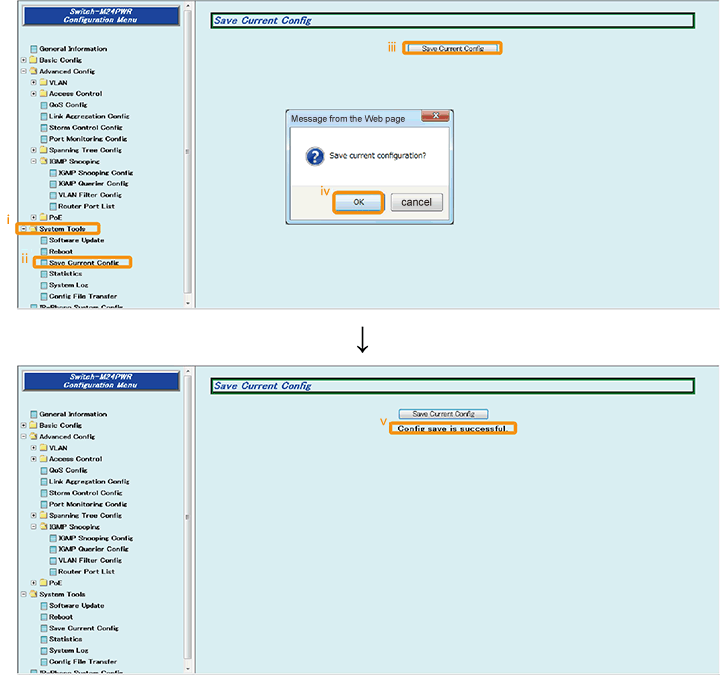
Step 5. Save the settings.
1) Select “System Tools” → ”Save Current Config”(i → ii).
2) Save the settings by “Save Current Config”(iii).
3) Execute saving by “OK”(iv).
4) Confirm that the settings are saved successfully (v).
Step 6. Connect the devices.
Referring to the configuration example, connect the devices.
Step 7. Execute operation check.
● Execute operation check of the spanning tree.
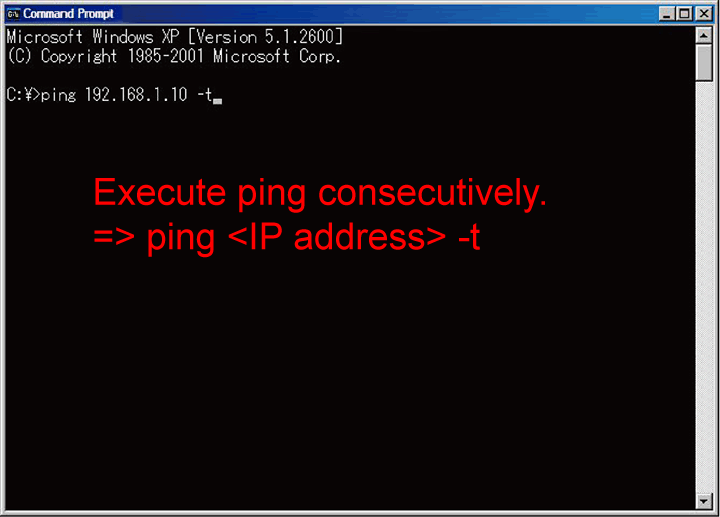
1) Communicate Ping consecutively between PC (i) and PC (ii).
・IP address of PC (i): 192.168.1.10/24 IP address of PC (ii): 192.168.1.20/24
・Send Ping consecutively by the command prompt.
・Execute Ping from PC (i) to PC (ii).
・Execute Ping from PC (ii) to PC (i).
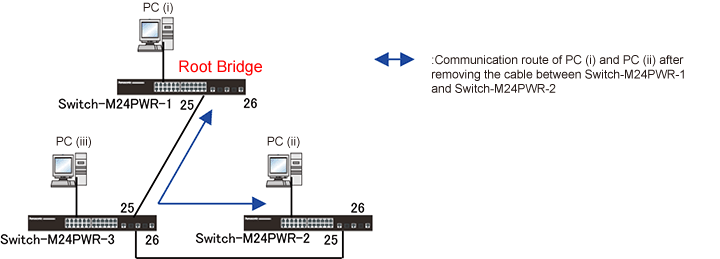
2) Pull out the cable that connects Switch-M24PWR-1 and Switch-M24PWR-2.
・Confirm that Ping times out for a several seconds and then starts communicating again.
・Confirm that the blocking port of Switch-M24PWR-3 is released and the communication path between PC (i) and PC (ii) has been switched.
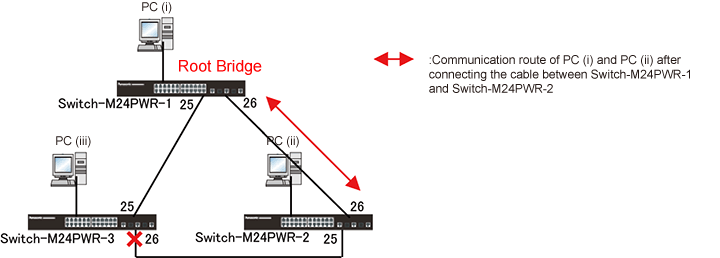
3) Re-connect the cable to Switch-M24PWR-1 and Switch-M24PWR-2.
・Confirm that Ping times out for a several seconds and then starts communicating again.
・Confirm that Port 26 of Switch-M24PWR-3 becomes the blocking port and that the communication path between PC (i) and PC (ii) has been switched.
ここからサブメニューです。