![]() Panasonic Electric Works Networks Co., Ltd. > Support > Setting Examples > Firmware Version Upgrade Procedure Using a SD Card (ZEQUO series)
Panasonic Electric Works Networks Co., Ltd. > Support > Setting Examples > Firmware Version Upgrade Procedure Using a SD Card (ZEQUO series)
ここから本文です。
Firmware Version Upgrade Procedure Using a SD Card (ZEQUO series)
Introduction
TThis setting example explains the procedure of saving a firmware for ZEQUO series switches that is acquired from the Internet website or other sources on a SD card and copying it to the ZEQUO series switches for version upgrade.
Applicable models
| Applicable models | |
|---|---|
| Product name | Product number |
| ZEQUO 6400 | PN36240E |
| ZEQUO 2200 | PN26241 |
| ZEQUO 2210 | PN26161 |
Overview
Save the firmware of ZEQUO series switch on a SD card.
Insert the SD card to the SD card slot on the ZEQUO series switch.
Copy the firmware on the SD card to the ZEQUO series switch.
Configure the firmware apply for the ZEQUO series switch.
Reboot the ZEQUO series switch.
Configuration Example
Overall setting flow
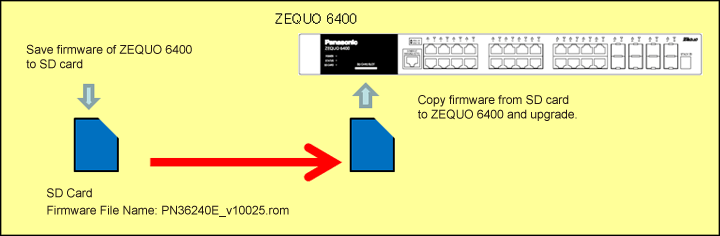
- 1. Save the firmware of ZEQUO 6400 (file name: PN36240E_v10025.rom) on a SD card.
- 2. Insert the SD card on which the firmware of ZEQUO 6400 (file name: PN36240E_v10025.rom) is saved into ZEQUO 6400.
- 3. Copy the firmware on the SD card (file name: PN36240E_v10025.rom) to ZEQUO 6400.
- 4. Specify the start-up firmware of ZEQUO 6400.
- 5. Restart ZEQUO 6400.
Setting Procedure
Step 1.
Save the firmware of ZEQUO 6400 on a SD card.
Use any file name for saving.
(Example: PN36240E_v10025.rom)
Step 2.
Insert the SD card on which the firmware is saved into the SD card slot of ZEQUO 6400.
Step 3.
Connect the PC and the Ethernet Switch using a console cable, and display the setting screen on Hyper terminal.
(Refer to Setting Example "Ethernet Switch Connection Procedure to a Console Port" for the procedure to display the setting screen on the console port)
Step 4.
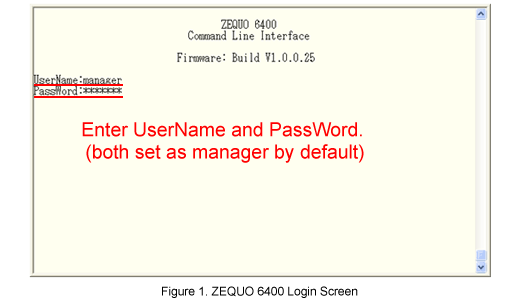
On the login screen, enter UserName and PassWord (both set as manager by default), and login to the setting screen. (Refer to Figure 1)
Step 5.
Copy the firmware in the D drive (SD card) into ZEQUO6400.
Specify the C drive (Flash) for the destination for copying.
After Z6400:admin#, enter command as shown in the following.
Z6400:admin#copy d:/PN36240E_v10025.rom c:/PN36240E_v10025.rom
If the command is entered correctly, the following message will appear.
Command: copy d:/PN36240E_v10025.rom c:/PN36240E_v10025.rom
Copying.................................Done!
Step 6.
Specify the file that is just copied into the start-up firmware of ZEQUO 6400.
Z6400:admin#config firmware image c:/PN36240E_v10025.rom boot_up
Command: config firmware image c:/PN36240E_v10025.rom boot_up
Success.
Step 7.
Restart ZEQUO 6400.
Z6400:admin#reboot
Command: reboot
The following confirmation message appears. In order to restart, select y.
Are you sure you want to proceed with the system reboot?(y/n)
Step 8.
The firmware specified at start-up of ZEQUO 6400 is automatically loaded.
Step 9.
When the start-up completes, log in to ZEQUO 6400.
(Refer to Step 4 for the login procedure.)
Step 10.
Confirm that the firmware version of ZEQUO 6400 has been changed.
* This setting can be conducted from the ZEQUO initial setting function of the integration support application.(Details)
ここからサブメニューです。