![]() Panasonic Electric Works Networks Co., Ltd. > Support > Setting Examples > QoS Setting Procedure (ZEQUO series)
Panasonic Electric Works Networks Co., Ltd. > Support > Setting Examples > QoS Setting Procedure (ZEQUO series)
ここから本文です。
QoS Setting Procedure (ZEQUO series)
Introduction
This setting example explains the procedure of QoS Setting for ZEQUO series switches.
Applicable models
| Applicable models | |
|---|---|
| Product name | Product number |
| ZEQUO 6400 | PN36240E |
| ZEQUO 2200 | PN26241 |
| ZEQUO 2210 | PN26161 |
Overview
This procedure describes how to conduct the packet priority control by QoS for ZEQUO series switches.
When it receives a packet with DSCP 46, it prevents the voice or other delays at a time of congestion by giving CoS 5 to VLAN tag of the packet to increase priority.
Configuration Example
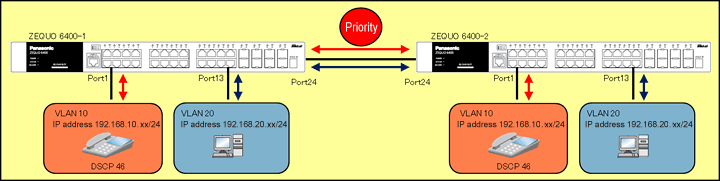
Overall setting flow
- 1. Set Ports 1-12 and 24 to VLAN group 10 (VID=10 VLAN NAME=IP_PHONE).
- 2. Set Ports 13-24 to VLAN group 20 (VID=20 VLAN NAME=PC).
- 3. Set ACL to mark CoS 5 when a packet with DSCP 46 is received.
- 4. Confirm that no delay for the voice of IP Phone or no other troubles will occur even when a large amount of data is being sent/received between the PCs.
Setting Procedure
Step 1.
Connect the PC and Ethernet Switch using a twisted pair cable and console cable, and display the setting screen on Hyper terminal.
(Refer to Setting Example "Ethernet Switch Connection Procedure to a Console Port" for the procedure to display the setting screen on the console port)
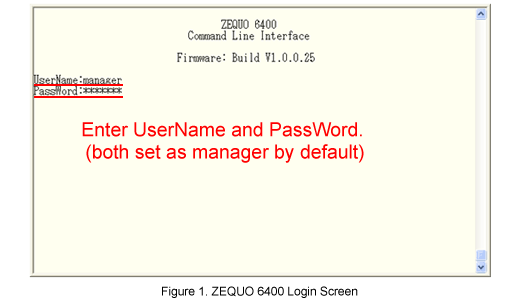
Step 2.
On the login screen, enter UserName and PassWord (both set as manager by default), and login to the setting screen. (Refer to Figure 1)
<Common to both ZEQUO 6400-1 and ZEQUO 6400-2>
Step 3.
Set VLAN for ZEQUO 6400.
After Z6400:admin#, enter command as shown in the following.
Z6400:admin#config vlan default delete 1-28
If the command is entered correctly, the following message will appear.
Command: config vlan default delete 1-28
Success.
Then, set the VLAN groups 10 and 20.
Z6400:admin#create vlan IP_PHONE tag 10
Command: create vlan IP_PHONE tag 10
Success.
Z6400:admin#config vlan IP_PHONE add untagged 1-12
Command: config vlan IP_PHONE add untagged 1-12
Success.
Z6400:admin#config vlan IP_PHONE add tagged 24
Command: config vlan IP_PHONE add tagged 24
Success.
Z6400:admin#config port_vlan 1-12 pvid 10
Command: config port_vlan 1-12 pvid 10
Success.
Z6400:admin#create vlan PC tag 20
Command: create vlan PC tag 20
Success.
Z6400:admin#config vlan PC add untagged 13-24
Command: config vlan PC add untagged 13-24
Success.
Z6400:admin#config port_vlan 13-24 pvid 20
Command: config port_vlan 13-24 pvid 20
Success.
Step 4.
Set ACL for ZEQUO 6400.
First, create an access list profile to define DSCP as a condition for filtering.
Z6400:admin#create access_profile profile_id 1 profile_name dscp_marking ip dscp
Command: create access_profile profile_id 1 profile_name dscp_marking ip dscp
Success.
Step 5.
Then, enter the target DSCP to the profile created in Step 4 to give CoS 5.
Z6400:admin#config access_profile profile_id 1 add access_id 1 ip dscp 46 port 1-12 permit priority 5
Command: config access_profile profile_id 1 add access_id 1 ip dscp 46 port 1-12 permit priority 5
Success.
Step 6.
When all the settings are complete, save the settings.
Z6400:admin#save
Command:save
Saving all configurations to NV-RAM.......... Done.
Step 7.
Confirm that no delay for the voice of IP Phone or no other troubles will occur even when a large amount of data is being sent/received between the PCs.
(Reference)
By default, it has been mapped as follows.
The control method is Strict Priority Queuing for all ports.
Z6400:admin#show 802.1p user_priority
Command: show 802.1p user_priority
QOS Class of Traffic
Priority-0 ->
Priority-1 ->
Priority-2 ->
Priority-3 ->
Priority-4 ->
Priority-5 ->
Priority-6 ->
Priority-7 ->
* Priority = CoS
* The bigger number for the Class has higher priority.
Z6400:admin#show scheduling_mechanism
Command: show scheduling_mechanism
Port Mode
----- ------
1 Strict
2 Strict
3 Strict
4 Strict
5 Strict
6 Strict
7 Strict
8 Strict
9 Strict
10 Strict
11 Strict
12 Strict
13 Strict
14 Strict
15 Strict
16 Strict
17 Strict
18 Strict
19 Strict
20 Strict
21 Strict
22 Strict
23 Strict
24 Strict
25 Strict
26 Strict
27 Strict
28 Strict
ここからサブメニューです。