ページの先頭です。
ここから本文です。
Stack Connection Setting Procedure (ZEQUO series)
Introduction
This setting example explains the procedure of Stack Connection Setting for ZEQUO series switches.
Applicable models
| Applicable models | |
|---|---|
| Product name | Product number |
| ZEQUO 6400 | PN36240E |
Overview
Interconnect ZEQUO 6400s with SFP+ direct attach cables (option) to have redundant connection of up to 3 Ethernet Switches.
Once they are connected, setting is available only from the master ZEQUO 6400.
When setting is conducted from the master ZEQUO 6400, the settings will automatically be reflected on the other ZEQUO 6400 switches, and when settings on the master ZEQUO 6400 are saved, they will automatically be saved on the other ZEQUO 6400 switches.
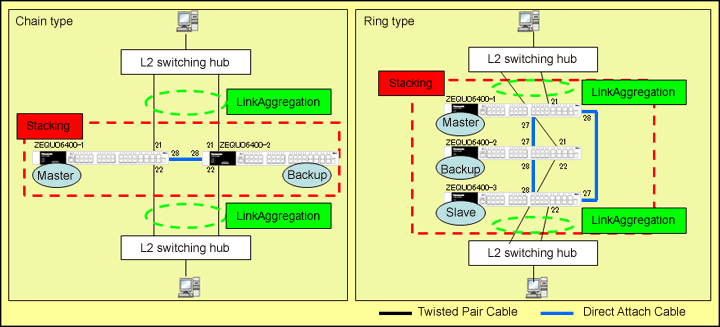
Configuration Example

Setting content and Procedure
- Enable stacking function.
- Set priorities for selecting a master (settings for ZEQUO 6400-3 is not required in chain topology).
ZEQUO 6400-1: Priority 10 (highest, master)
ZEQUO 6400-2: Priority 20 (second highest, backup)
ZEQUO 6400-3: Priority 30 (third highest, slave)
- Set Link Aggregation function and create groups as follows (mode: static):
■Chain configuration:
1)Port 21 of ZEQUO 6400-1 and Port 21 of ZEQUO 6400-2
2)Port 22 of ZEQUO 6400-1 and Port 22 of ZEQUO 6400-2
■Ring configuration:
1)Port 21 of ZEQUO 6400-1 and Port 21 of ZEQUO 6400-2
2)Port 22 of ZEQUO 6400-2 and Port 22 of ZEQUO 6400-3
Overall setting flow
- 1. Set stacking connection for ZEQUO 6400-1.
- 1) Enable stacking function using "config stacking_mode" command.
- 2) Set priority: 10 to select its master using "config box_priority" command.
- 2. Configure the same settings on ZEQUO 6400-2 and ZEQUO 6400-3 for stacking connection.
(Settings for ZEQUO 6400-3 is not required in the chain topology).
(ZEQUO 6400-2 priority: 20, ZEQUO 6400-3 priority: 30) - 3. Connect ZEQUO 6400-1, ZEQUO 6400-2, and ZEQUO 6400-3 with SFP+ direct attach cable as shown in the configuration diagram, and check if all ZEQUO 6400s recognize the stacking connection by using "show stack_information" command.
- 4. Set the link aggregation for ZEQUO 6400.
- 1) Create groups by using "create link_aggregation" command (mode: static).
- 2) Set a master port and port members of the group created using "config link_aggregation" command.
Setting example
Step 1.
Connect the PC and Ethernet Switch using a twisted pair cable and console cable, and display the setting screen on Hyper terminal.
(Refer to Setting Example "Ethernet Switch Connection Procedure to a Console Port" for the procedure to display the setting screen on the console port)
Step 2.
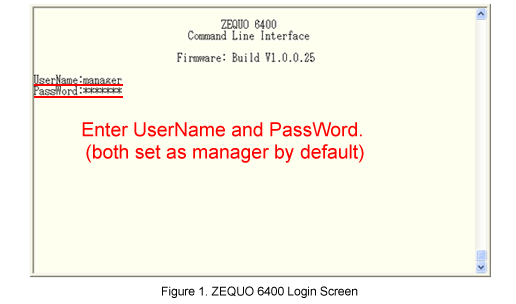
On the login screen, enter UserName and PassWord (both set as manager by default), and login to the setting screen. (Refer to Figure 1)

Step 3.
- Enable stacking function for ZEQUO 6400-1.
After Z6400:admin#, enter the command as shown in the following.
Z6400:admin#config stacking_mode enable
If the command is entered correctly, the system will be automatically restarted.
Command: config stacking_mode enable
Change stacking mode may cause devices restart!
Please wait, the switch is rebooting...
Step 4.
Set priority: 10 to select a master of stacking function.
Z6400:admin#config box_priority current_box_id 1 priority 10
Command: config box_priority current_box_id 1 priority 10
Success.
Step 5.
Save the settings.
Z6400:admin#save
Command: save
Saving all configurations to NV-RAM.......... Done.
Step 6.
Along with the same procedure described in Step 3 to 5, configure the settings for ZEQUO 6400-2 and ZEQUO 6400-3, and save.
(ZEQUO 6400-2 priority: 20; ZEQUO 6400-3 priority: 30)
(Settings for ZEQUO 6400-3 is not required in the chain topology).
Step 7.
As configuration example, connect SFP+ direct attach cables.
A little later, the color of port LEDs on the front panels of ZEQUO 6400-2 and ZEQUO 6400-3 will flash as Orange → Green → Orange → Green each for about one second.
After the LED lights are off, check that stacking connection is recognized on the console port of ZEQUO 6400-1.
(The configuration screen can only be viewed from ZEQUO 6400-1 which has been configured as the master in this stacking connection.)
Z6400:admin#show stack_information
Command: show stack_information
Topology :Duplex_Ring
My Box ID :1
Master ID :1
BK Master ID :2
Box Count :3
Force Master Role: Disabled

Step 8.
Create group: 1 and group: 2 in the link aggregation from the console port of ZEQUO 6400-1.
Z6400:admin#create link_aggregation group_id 1 type static
Command: create link_aggregation group_id 1 type static
Success.
Z6400:admin#create link_aggregation group_id 2 type static
Command: create link_aggregation group_id 2 type static
Success.
Step 9.
Assign port to the group created in Step 8.
■Chain configuration:
Z6400:admin#config link_aggregation group_id 1 master_port 1:21 ports 1:21,2:21
Command: config link_aggregation group_id 1 master_port 1:21 ports 1:21,2:21
Success.
Z6400:admin#config link_aggregation group_id 2 master_port 1:22 ports 1:22,2:22
Command: config link_aggregation group_id 2 master_port 1:22 ports 1:22,2:22
Success.
■Ring configuration:
Z6400:admin#config link_aggregation group_id 1 master_port 1:21 ports 1:21,2:21
Command: config link_aggregation group_id 1 master_port 1:21 ports 1:21,2:21
Success.
Z6400:admin#config link_aggregation group_id 2 master_port 2:22 ports 2:22,3:22
Command: config link_aggregation group_id 2 master_port 1:22 ports 1:22,2:22
Success.
Step 10.
When all the settings are complete, save the settings.
Z6400:admin#save
Command: save
Saving all configurations to NV-RAM.......... Done.
Step 11.
Connect the terminals referring to the configuration example and conduct communication test.
- Confirm that the network communication works properly even when the power of master is off.
ここからサブメニューです。