![]() Panasonic Electric Works Networks Co., Ltd. > Support > Setting Examples > SFP Module Setting Procedure
Panasonic Electric Works Networks Co., Ltd. > Support > Setting Examples > SFP Module Setting Procedure
ここから本文です。
SFP Module Setting Procedure
Introduction
This setting example explains the procedure of SFP Module Setting.
Applicable models
| Applicable models | |
|---|---|
| Product name | Product number |
| Switch-M48eG | PN28480K |
| Switch-M24eG | PN28240K |
| Switch-M16eG | PN28160K |
| Switch-M8eG | PN28080K |
| Switch-M24eGLPWR+ | PN28248 |
| Switch-M16eGLPWR+ | PN28168 |
| Switch-M12eGLPWR+ | PN28128 |
| Switch-M8eGLPWR+ | PN28088 |
| Switch-M5eGLPWR+ | PN28058 |
Overview
This function allows to check status (optic power, temperature, operating voltage, operating current) of SFP module that is inserted to switch.
It supports to isolate faults in optical networks connected.
In addition, this function also allows the system to send SNMP trap when a value exceeds upper or lower threshold value.
* For product numbers of supported SFP modules, see the operation manual.
Configuration Example
Overall setting flow
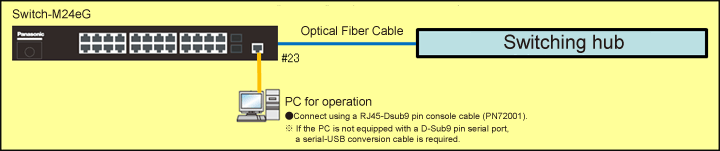
- 1. Insert SFP modules to Switch-M24eG and Ethernet Switch at the opposite end.
- 2. Connect SFP modules with an optic fiber cable.
- 3. On Switch-M24eG setting screen, check the status of SFP modules.
Setting Procedure
Step 1.
Connect the PC and Ethernet Switch using a console cable, and display the setting screen on a terminal emulator such as ZEQUO assist Plus.
Step 2.
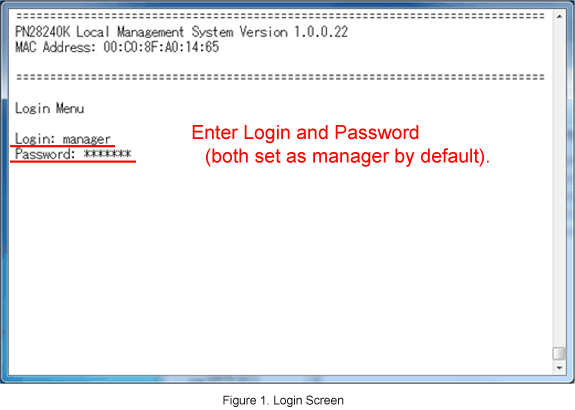
On the login screen, enter Login and Password (both set as manager by default), and login to the setting screen. (Refer to Figure 1)
Step 3.
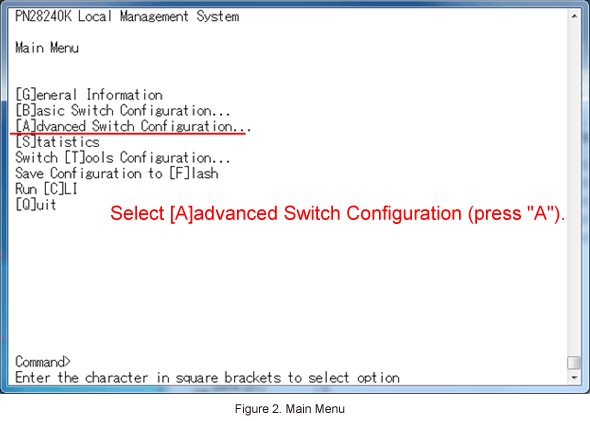
In Main Menu, select [A]dvanced Switch Configuration. (Refer to Figure 2)
Step 4.
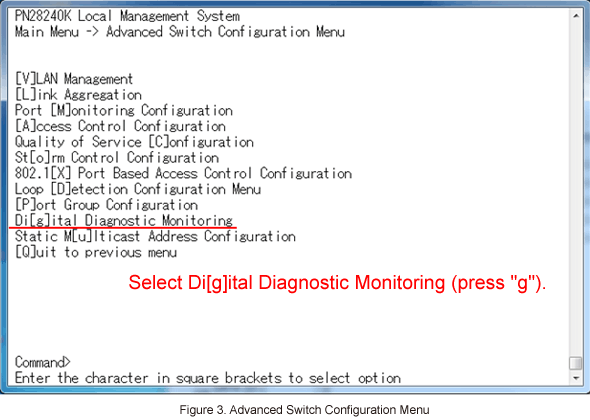
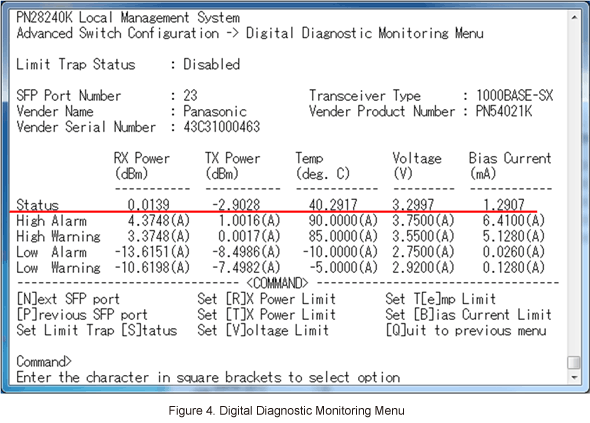
In Advanced Switch Configuration Menu, select Di[g]ital Diagnostic Monitoring, and go to SFP module status confirmation screen. (Refer to Figure 3)
Step 5.
In Digital Diagnostic Monitoring Menu, check the values of Status. (Refer to Figure 4)
* For description about the other items such as Alarm and Warning, see the operation manual.
ここからサブメニューです。