ページの先頭です。
ここから本文です。
PoE Scheduler Setting Procedure (for WEB)
Introduction
This setting example explains the procedure of PoE Scheduler Setting for WEB.
This setting enables to manage schedules of power supply to IP phones. Contact your manager responsible for IP phone before conducting the settings.
Applicable models
| Applicable models | |
|---|---|
| Product number | Product name |
| PN28248 | Switch-M24eGLPWR+ |
| PN28168 | Switch-M16eGLPWR+ |
| PN28128 | Switch-M12eGLPWR+ |
| PN28088 | Switch-M8eGLPWR+ |
| PN28058 | Switch-M5eGLPWR+ |
Overview
This function turns off the power supply during out-of-operation hours by managing the schedule of PoE power supply for the switch.
It enables energy saving and operation control on PoE devices.
* To activate PoE Scheduler, the Scheduler time has to be synchronized with the server clock via SNTP.
Configuration Example

Setting Flow
- 1. Connect to the Web management screen of Switch-M8eGLPWR+.
- 2. Set Switch-M8eGLPWR+.
- 1) Set SNTP (Server IP: 192.168.0.10, Synchronization interval: 60min).
- 2) Set PoE Scheduler in accordance with the schedule described in the above configuration example.
- 3. Connect Switch-M8eGLPWR+ with each device.
- 4. Check if PoE power supply to Ports 2 to 20 is turned OFF/ON at the scheduled time.
Setting Procedure
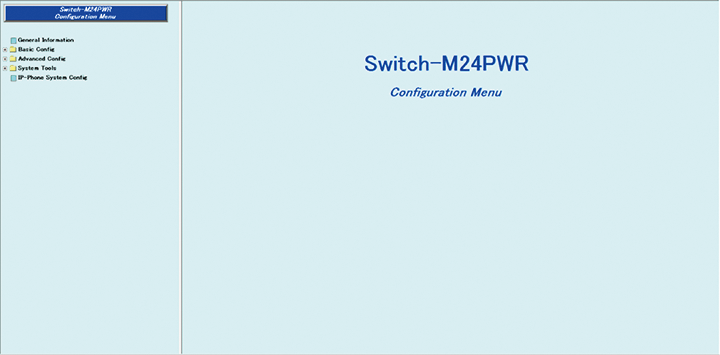
Step 1. Connect to the Web management screen of Switch-M8eGLPWR+ and login.
Connect the PC and Ethernet Switch using a twisted pair cable, and connect to the Web management screen of Switch-M8eGLPWR+.
(Refer to setting example “Connection Procedures to Ethernet Switch Web Management Screen” for the procedure to connect to the Web management screen)
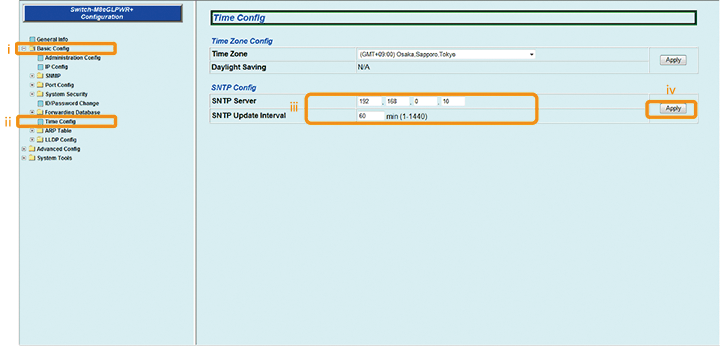
Step 2. Perform the SNTP setting.
1) Select “Basic Config” → “Time Config” (i → ii).
2) Enter “192.168.0.10” to the input column of SNTP Server and “60” to SNTP Update Interval for SNTP Config (iii).
3) Apply the setting by “Apply” (iv).
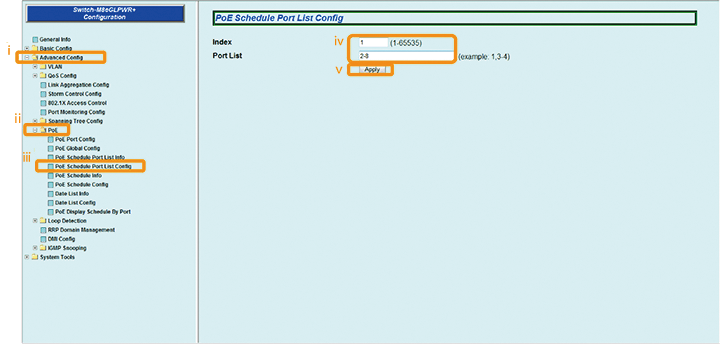
Step 3. Set the port list to operate the PoE scheduler.
1) Select “Advanced Config” → “PoE” → “PoE Schedule Port List Config” (i → ii → iii).
2) Enter “1” for Index and “2-8” for Port List (iv).
3) Apply the setting by “Apply” (v).
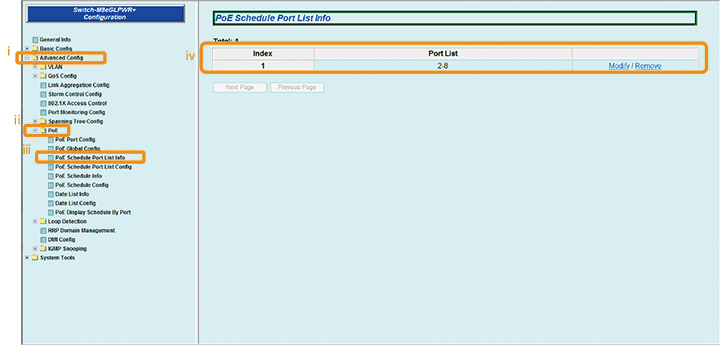
Step 4. Confirm that the port list is created.
1) Select “Advanced Config” → “PoE” → “PoE Schedule Port List Info” (i → ii → iii).
2) Confirm that the content set in Step 3 is displayed (iv).
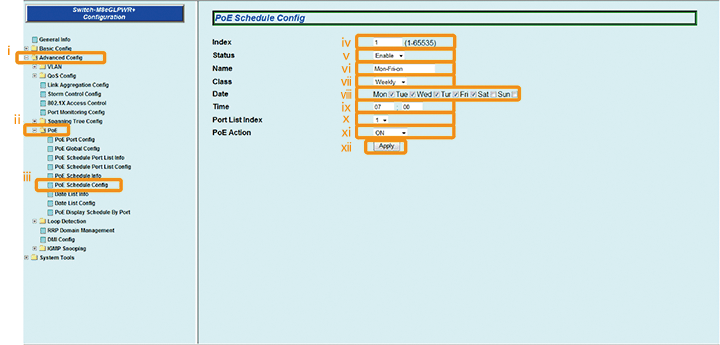
Step 5. Set the schedule so that PoE power supply of the port turns on at 7 a.m. on Monday through Friday.
1) Select “Advanced Config” → “PoE” → “PoE Schedule Config” (i → ii → iii).
2) Enter “1” for Index, select “Enable” for Status, enter “Mon-Fri_ON” for Name, select “Weekly” for Class,
place a check to “Mon,” “Tue,” “Wed,” “Tur,” and “Fri” for Date, enter “07:00” for Time, select “1” for Port List Index, and select “ON” for PoE Action (iv to xi).
3) Apply the setting by “Apply” (xii).
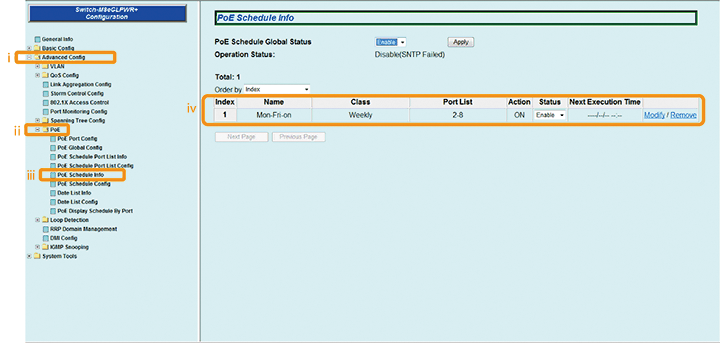
Step 6. Confirm that the contents set in Step 5 are applied.
1) Select “Advanced Config” → “PoE” → “PoE Schedule Info” (i → ii → iii).
2) Confirm that the contents set in Step 5 are displayed (iv).
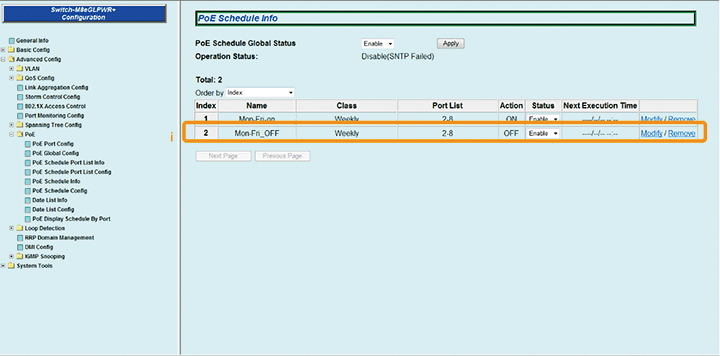
Step 7. Set the schedule so that PoE power supply of the port turns off at 7 p.m. on Monday through Friday.
1) Set as follows in a similar manner as Step 5.
- Enter “2” for Index.
- Select “Enable” for Status.
- Enter “Mon-Fri_OFF” for Name.
- Select “Weekly” for Class.
- Place a check to “Mon,” “Tue,” “Wed,” “Tur,” and “Fri” for Date.
- Enter “19:00” for Time.
- Select “1” for Port List Index.
- Select “ON” for PoE Action.
2) Confirm that the setting is displayed in Index 2 (i).
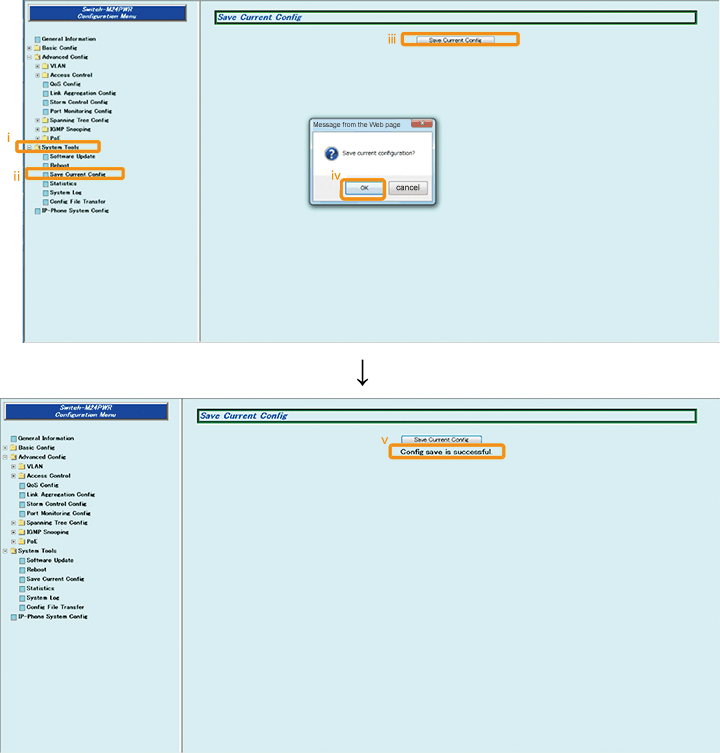
Step 8. Save the settings.
1) Select “System Tools” → ”Save Current Config”(i → ii).
2) Save the settings by “Save Current Config”(iii).
3) Execute saving by “OK”(iv).
4) Confirm that the settings are saved successfully (v).
Step 9. Connect the devices.
Referring to the configuration example on page 1, connect the devices.
Step 10. Execute operation check.
Check if PoE power supply to Ports 2 to 20 is turned OFF/ON at the scheduled time.
ここからサブメニューです。