![]() Panasonic Electric Works Networks Co., Ltd. > Support > Setting Examples > Time Setting Procedure (for WEB)
Panasonic Electric Works Networks Co., Ltd. > Support > Setting Examples > Time Setting Procedure (for WEB)
ここから本文です。
Time Setting Procedure (for WEB)
Introduction
This setting example explains the procedure of manually setting the time of switches for WEB. (In this setting example, SNTP time setting is not performed)
Applicable models
| Applicable models | |
|---|---|
| Product number | Product name |
| PN23249K | Switch-M24PWR |
| PN23169K | Switch-M16PWR |
| PN23129K | Switch-M12PWR |
Overview
On your switch, set time by entering it manually.
Configuration Example

Setting Flow
- 1. Connect to the Web management screen of Switch-M24PWR.
- 2. Enter the time and date (year, month, day, hour, minute, and second) which you want to set manually for Switch-M24PWR.
- 3. Confirm that the entered time is applied.
* In this setting example, SNTP time setting is not performed.
Setting Procedure
Step 1. Connect to the Web management screen of Switch-M24PWR and login.
Connect the PC and Ethernet Switch using a twisted pair cable, and connect to the Web management screen of Switch-M24PWR.
(Refer to setting example “Connection Procedures to Ethernet Switch Web Management Screen” for the procedure to connect to the Web management screen)
Step 2. Set the time.
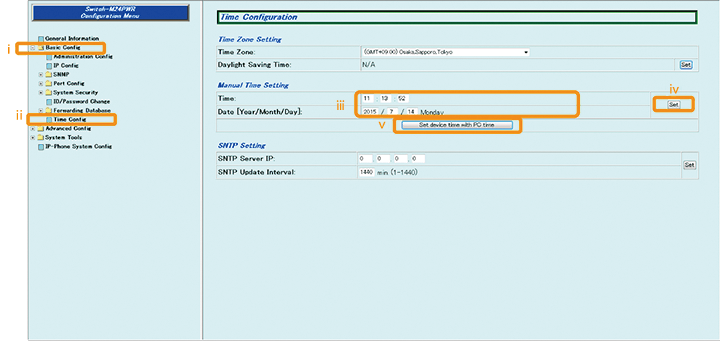
1) Select “Basic Config” → “Time Config” (i → ii).
2) Enter the current date and time to Time and Date [Year/Month/Day] of Manual Time Setting (iii).
3) Set by “Set” (iv).
* To reflect the time of the PC, press to set “Set device time with PC time”(v).
Step 3. Save the settings.
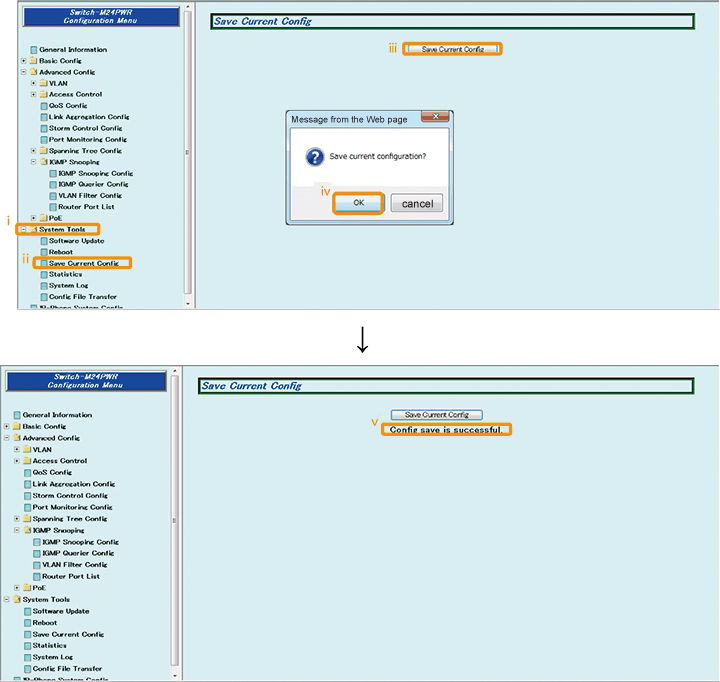
1) Select “System Tools” → ”Save Current Config”(i → ii).
2) Save the settings by “Save Current Config”(iii).
3) Execute saving by “OK”(iv).
4) Confirm that the settings are saved successfully (v).
ここからサブメニューです。