ページの先頭です。
![]() Panasonic Electric Works Networks Co., Ltd. > Support > Setting Examples > PoE Scheduler Setting Procedure
Panasonic Electric Works Networks Co., Ltd. > Support > Setting Examples > PoE Scheduler Setting Procedure
ここから本文です。
PoE Scheduler Setting Procedure
Introduction
This setting example explains the procedure of PoE Scheduler Setting.
This setting enables to manage schedules of power supply to IP phones. Contact your manager responsible for IP phone before conducting the settings.
Applicable models
| Applicable models | |
|---|---|
| Product name | Product number |
| Switch-M24eGLPWR+ | PN28248 |
| Switch-M16eGLPWR+ | PN28168 |
| Switch-M12eGLPWR+ | PN28128 |
| Switch-M8eGLPWR+ | PN28088 |
| Switch-M5eGLPWR+ | PN28058 |
| Switch-S24GPWR | PN25249 |
Overview
This function turns off the power supply during out-of-operation hours by managing the schedule of PoE power supply for switch.
It enables energy saving and operation control on PoE devices.
* To activate PoE Scheduler, the Scheduler time has to be synchronized with the server clock via SNTP.
Configuration Example

Overall setting flow
- 1. Set Switch-S24GPWR.
- 1) Set 192.168.1.100/24 as the IP address.
- 2) Set SNTP (Server IP: 192.168.1.1, Synchronization interval: 60min).
- 3) Set PoE Scheduler in accordance with the schedule described in the above configuration example.
- 2. Connect Switch-S24GPWR with each device.
- 3. Check if PoE power supply to Ports 2 to 20 is turned OFF/ON at the scheduled time.
Setting Procedure
Step 1.
Connect the PC and Ethernet Switch using a twisted pair cable and console cable, and display the setting screen on a terminal emulator such as ZEQUO assist Plus.
(Refer to Setting Example "Ethernet Switch Connection Procedure to a Console Port" for the procedure to display the setting screen on the console port)
Step 2.
On the login screen, enter Login and Password (both set as manager by default), and login to the setting screen. (Refer to Figure 1)

Step 3.
In Main Menu, select [B]asic Switch Configuration. (Refer to Figure 2)

Step 4.
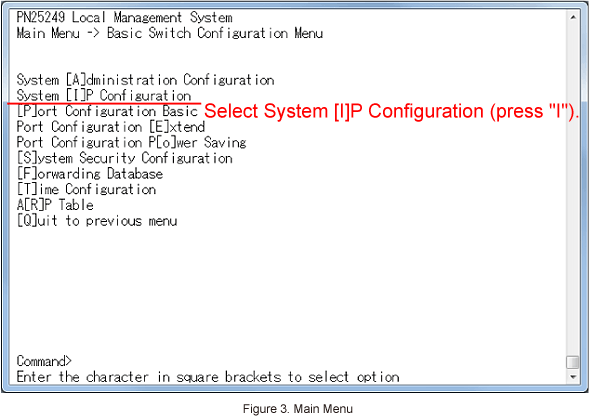
In Basic Switch Configuration Menu, select System IP Configuration and set the IP address/subnet mask/Default Gateway. (Refer to Figure 3)
Step 5.
In System IP Configuration Menu, select Set [I]P Address and set the IP address (192.168.1.100). (Refer to Figure 4)

Step 6.
Then, select Set Subnet [M]ask and set the subnet mask (255.255.255.0). (Refer to Figure 5)

Step 7.
Next, select Set Default [G]ateway and set the default gateway (192.168.1.254). (Refer to Figure 6)

Step 8.
After the settings are conducted, confirm that the following messages appear, and go back to Basic Switch Configuration Menu by selecting [Q]uit to previous menu. (Refer to Figure 7)

Step 9.
In Basic Switch Configuration Menu, select [T]ime Configuration to conduct SNTP setting. (Refer to Figure 8)

Step 10.
In Time Configuration Menu, select Set SNTP Server I[P] and set the IP address of SNTP Server (192.168.1.1). (Refer to Figure 9)

Step 11.
Then, select Set SNTP [I]nterval and set the synchronization interval (60min.). (Refer to Figure 10)

Step 12.
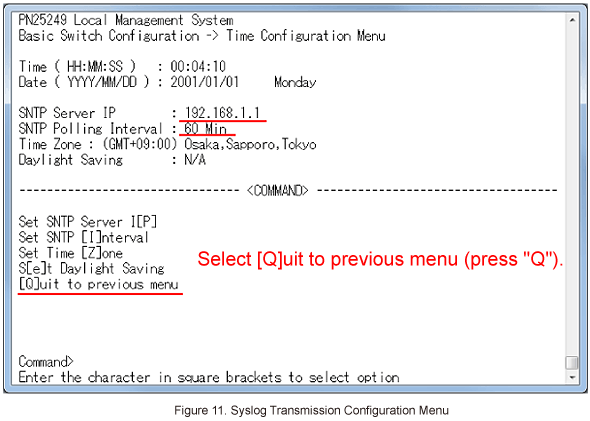
After the settings are conducted, confirm that the following messages appear, and go back to Basic Switch Configuration Menu by selecting [Q]uit to previous menu. (Refer to Figure 11)
Step 13.
In Basic Switch Configuration Menu, select [Q]uit to previous menu and go back to Main Menu.
Step 14.
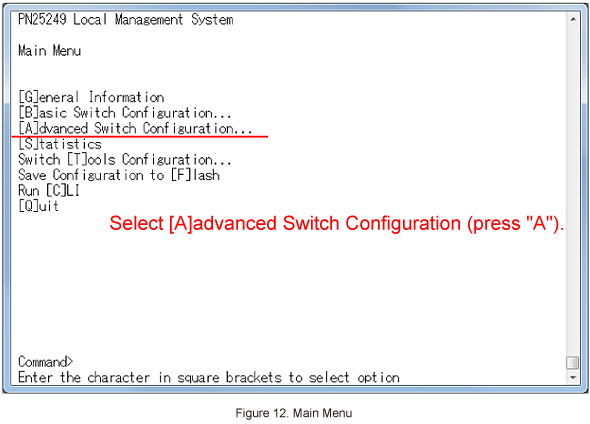
In Main Menu, select [A]dvanced Switch Configuration. (Refer to Figure 12)
Step 15.
In Advanced Switch Configuration Menu, select [P]ower Over Ethernet Configuration. (Refer to Figure 13)

Step 16.
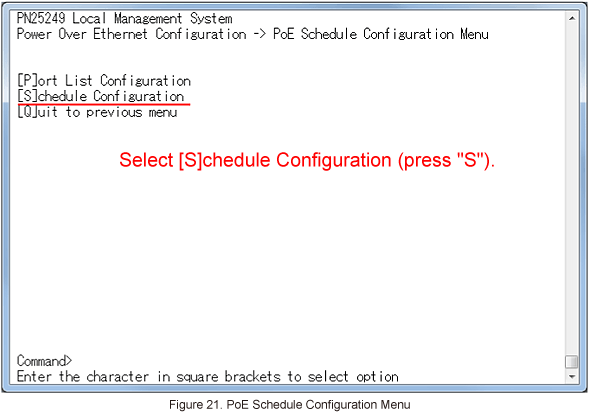
In Power Over Ethernet Configuration Menu, select PoE [S]chedule Configuration and set PoE schedule. (Refer to Figure 14)

Step 17.
In PoE Schedule Configuration Menu, select [P]ort List Configuration and set a port list to run the schedule. (Refer to Figure 15)

Step 18.
In Port List Configuration Menu, select [C]reate Port List to create a port list. (Refer to Figure 16)

Step 19.
In Port List Creation Menu, select Set Port List [I]ndex and set Index Number (1). (Refer to Figure 17)

Step 20.
Next, select Set Port [L]ist, and set a port number (Port 2 to 20). (Refer to Figure 18)

Step 21.
After performing the settings, confirm that the settings are in the following status.
Select [A]pply Port List to apply the settings. (Refer to Figure 19)

Step 22.
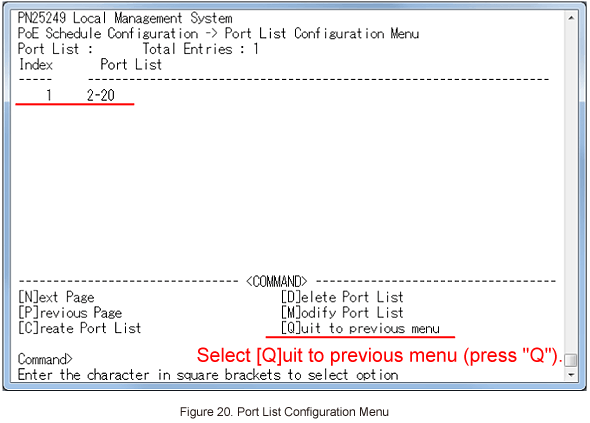
In Port List Configuration Menu, confirm that the settings are in the following status. (Refer to Figure 20)
Select [Q]uit to previous menu and go back to PoE Schedule Configuration Menu.
Step 23.
In PoE Schedule Configuration Menu, select [S]chedule Configuration and set PoE schedule. (Refer to Figure 21)
Step 24.
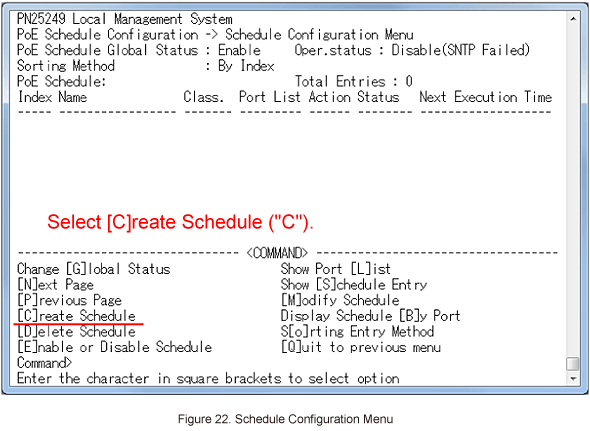
In Schedule Configuration Menu, select [C]reate Schedule and create the schedule to turn ON the PoE of the port at 7, Monday to Friday. (Refer to Figure 22)
Step 25.
In Create Schedule Configuration Menu, select Set [S]chedule Index and set Index Number (1). (Refer to Figure 23)

Step 26.
Then, select Set Schedule [N]ame to set the schedule name (Mon-Fri_ON). (Refer to Figure 24)

Step 27.
Next, select Select [C]lassifier and set the class (weekly operation) of the schedule. (Refer to Figure 25)

Note
If operation timing of the classes are the same, the schedule of the class whith higher priority will be executed as described below.
[High] Datelist > Monthly > Weekly > Daily [Low]
Step 28.
Then, select Set [D]ate and set the day (mon, tue, wed, thu, fri) to execute the schedule. (Refer to Figure 26)

Step 29.
Then, select Set [T]ime and specify hour (7) to execute the schedule. (Refer to Figure 27)

Step 30.
Specify minute (0) to execute the schedule. (Refer to Figure 28)

Step 31.
Then select Set Port List Inde[x], and set Port List Index Number (1). (Refer to Figure 29)

Step 32.
Next, select Select [P]oE action, and set the power control of the port (ON). (Refer to Figure 30)

Step 33.
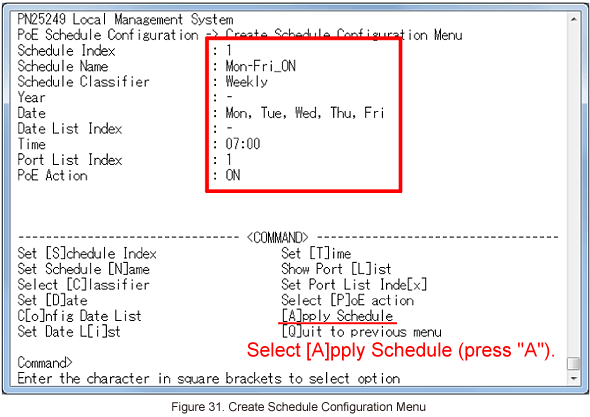
After performing the settings, confirm that the settings are in the following status.
Select [A]pply Schedule to apply the setting. (Refer to Figure 31)
Step 34.
In Schedule Configuration Menu, select [C]reate Schedule and create a schedule to turn OFF the PoE of the port at 19:00 , Monday to Friday. (Refer to Figure 32)

Step 35.
Follow the Steps 24 to 31 to set as in the following status. (Refer to Figure 33)
Select [A]pply Schedule to apply the setting.

Step 36.
In Schedule Configuration Menu, confirm that the settings are in the following status. (Refer to Figure 34)

Step 37.
Connect Switch-S24GPWR with other devices as illustrated on the configuration drawing.
When Switch-S24GPWR clock synchronizes with SNTP clock, Oper.status will change to Enable as follows, which enables PoE Scheduler function to operate. (Refer to Figure 35)

Step 38.
After completing the settings, save the settings using Save Configuration to [F]lash.
Step 39.
Check if PoE power supply to Ports 2 to 20 is turned OFF/ON at the scheduled time.
ここからサブメニューです。
![]() Panasonic Electric Works Networks Co., Ltd. > Support > Setting Examples > DHCP Relay Setting Procedure (ZEQUO series)
Panasonic Electric Works Networks Co., Ltd. > Support > Setting Examples > DHCP Relay Setting Procedure (ZEQUO series)
![]()