ページの先頭です。
ここから本文です。
Time Setting Procedure
Introduction
This setting example explains the procedure of manually setting the time of switches. (In this setting example, SNTP time setting is not performed.)
Applicable models
| Applicable models | |
|---|---|
| Product name | Product number |
| Switch-M48eG | PN28480K |
| Switch-M24eG | PN28240K |
| Switch-M16eG | PN28160K |
| Switch-M8eG | PN28080K |
| Switch-M24PWR | PN23249K |
| Switch-M16PWR | PN23169K |
| Switch-M12PWR | PN23129K |
Overview
On your switch, set time by entering it manually.
Configuration Example

Overall setting flow
Manual Time Setting
- 1. Enter the time and date (year, month, day, hour, minute, and second) which you want to set manually.
- 2. Confirm that the entered time is applied.
Setting Procedure
Step 1.
Connect the PC and Ethernet Switch using a twisted pair cable and console cable, and display the setting screen on Hyper terminal.
(Refer to Setting Example "Ethernet Switch Connection Procedure to a Console Port" for the procedure to display the setting screen on the console port)
Step 2.
On the login screen, enter Login and Password (both set as manager by default), and login to the setting screen. (Refer to Figure 1)

Step 3.
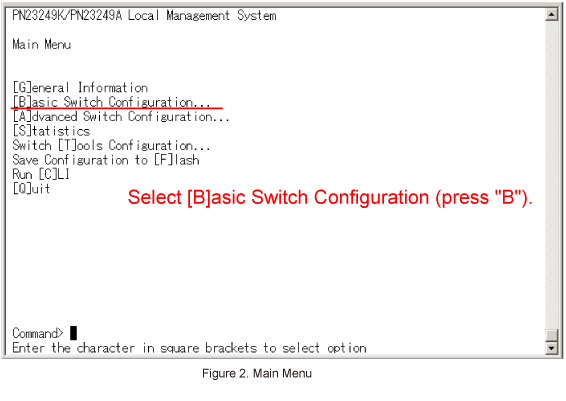
In Main Menu, select [B]asic Switch Configuration. (Refer to Figure 2)

Step 4.
In Basic Switch Configuration Menu, select [T]ime Configuration. (Refer to Figure 3)

Step 5.
In Time Configuration Menu, select Set [C]lock Time.
You are asked to enter date and time in the order of year, month, day, hour, minute, and second.
When Enter Date(Year) > is displayed, enter a year and press the Enter key. (Refer to Figure 4)

Step 6.
Then, when Enter Date(Month) > is displayed, enter a month and press the Enter key. (Refer to Figure 5)

Step 7.
Then, when Enter Date(Day) > is displayed, enter a day and press the Enter key. (Refer to Figure 6)

Step 8.
Then, when Enter Time(Hour) > is displayed, enter an hour and press the Enter key. (Refer to Figure 7)

Step 9.
Then, when Enter Time(Minute) > is displayed, enter a minute and press the Enter key. (Refer to Figure 8)

Step 10.
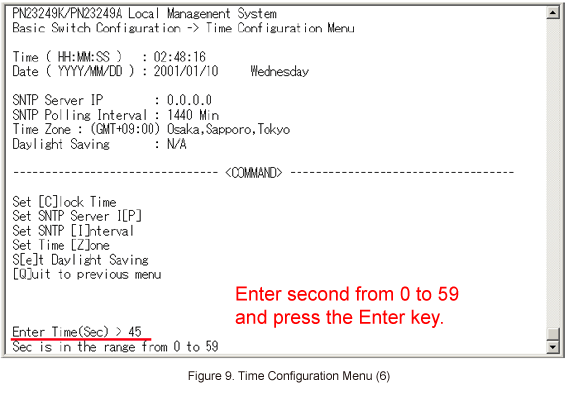
Then, when Enter Time(Sec) > is displayed, enter a second and press the Enter key. (Refer to Figure 9)

Step 11.
Once all of the entries are complete, the entered values will be displayed in the Time field and the Date field. (Refer to Figure 10)

* The time specified in the configuration file is not applied.
* If the device is reset to the factory default settings, the time is also reset to the initial value.
ここからサブメニューです。